Today I am happy to announce the release of H2O version 1.6.1. The release fixes two build-related issues found in 1.6.0 (link: release notes).
Among them, one is a build error on ARMv8-A, i.e. the 64-bit ARM architecture.
Yes, we now officially support 64-bit ARM!
In late 2015 we have started to see 64bit ARM-based servers / appliances hit the market, and it is likely that we would see more in the coming year.
I hope that H2O will be the best HTTP server for the platform.
EDIT. Personally I am enjoying using Geekbox, a sub-$100 microserver with an octa-core Cortex-A53 processor running Ubuntu :)
Friday, December 18, 2015

Friday, December 4, 2015
H2O HTTP/2 server version 1.6.0 released
Today, I have tagged version 1.6.0 of the H2O HTTP/2 server.
Full list of changes can be found in the release note, but following are the significant ones as I believe.
Error pages are now customizable #606
Finally, error pages can be customized.
You can specify any URL; the contents of the specified URL will be sent to the client when returning an error response. Please consult the document of the errordoc handler for more information.
Support for WebSocket #581
Thanks to Justin Zhu, H2O standalone server is now capable of proxying WebSocket connections.
The feature is considered experimental for the time being and you would need to turn it on explicitly if you need to use it. We will turn the feature on by default in future releases.
Smart file descriptor caching #596
The standalone server now caches open file descriptors, so that serving small static files is significantly faster in version 1.6 when compared to 1.5.
Website administrators need not worry about stale files getting served; the cached file descriptors are closed every once the event loop is being run. In other words, requests that arrive after a file is being modified are guaranteed to have the modified version being served.
Hopefully I will post a benchmark covering the changes in an upcoming blogpost.
HTTP/2 push triggered by mruby is processed ASAP #593
In prior releases, pushed responses were not sent until the response to the request that triggered the push become ready. In 1.6.0, the behavior has been changes so that push triggered by mruby is actually sent while the request is processed by an application server.
The change has noticeable positive impact on user experience, please consult Optimizing performance of multi-tier web applications using HTTP/2 push.
PS. and if you are interested in using H2O with a certificate issued by Let's Encrypt, please refer to Using H2O with Let's Encrypt.
Have fun!

Thursday, December 3, 2015
Optimizing performance of multi-tier web applications using HTTP/2 push
Push is a feature of HTTP/2, that allows a server to speculatively send response to a client, anticipating that the client will use the response.
In my earlier blogpost, I wrote that HTTP/2 push does not have significant effect on web performance when serving static files from a single HTTP/2 server. While that is true, push does improve performance by noticeable margin in other scenarios. Let's look into one common case.
The Theory
Many if not most of today's web applications are multi-tiered. Typically, an HTTP request from a client is first accepted by an httpd (either operated by the provider of the web service or by a CDN operator). The httpd serves asset files by itself, while routing requests for HTML documents to application server through fastcgi or HTTP/1.
It is when the response from the application server takes time that HTTP/2 push gives us a big performance boost.
The chart below should be a clear explanation why. With HTTP/2 push, it has become possible for a server to start sending assets that are going to be referred from HTML, before the generated HTML is returned from the application running behind.
It is not uncommon for an web application to spend hundreds of milliseconds processing an HTTP request, querying and updating the database. It is also common for a CDN edge server to wait for hundreds of milliseconds fetching a HTTP response from an web application server through an inter-continental connection.
In case of the chart, RTT between httpd and client is 50ms and the processing time is 200ms. Therefore, the server is capable of spending 4 round-trips (or typically slightly above 200KB of bandwidth1) for pushing asset files before HTML becomes ready to be served.
And thanks to push transactions, the connection will be warm enough by the time when HTML becomes available to the web server, so that the chance of the server being able to send whole document at once becomes bigger.
Theoretically, the upper bound of time reducible by the proposed approach (i.e. push assets until the main document becomes ready) is:
Cache-aware Server Push
Even in case you have a time window that can be used to push few hundred kilobytes of data, you would definitely not want to waste the bandwidth by pushing responses already cached by the client.
That is why cache-aware server-pusher (CASPER) becomes important.
Initially implemented as an experimental feature in H2O HTTP2 server version 1.5, CASPER tracks the cache state of the web browser using a single Cookie2. The cookie contains a fingerprint of all the high-priority asset files being cached by the browser compressed using Golomb-compressed sets. H2O updates the fingerprint every time it serves a high-priority asset file, as well as for determining whether certain asset files should be pushed or not.
It should be noted that the current fingerprint maintained by the cookie is at best a poor estimate of what is being cached by the client. Without a way to peek into the web browser cache, we cannot update the fingerprint stored in the cookie to reflect evictions from the cache2. Ideally, web browsers should calculate the fingerprint by itself and send the value to the server. But until then, we have to live with using cookies (or a ServiceWorker-based implementation that would give us freedom in implementing our own cache3) as a hacky workaround.
Benchmark
Let's move on to an experiment to verify if the theory can be applied in practice.
For the purpose, I am using the top page of h2o.examp1e.net. The server (H2O version 1.6.0-beta2 with CASPER enabled; see configuration) is given 50ms simulated latency using
FWIW, the size of the responses being served are as follows:
Blocking assets are CSS and JavaScript files that block the critical rendering path (i.e. the files that need to be obtained by the browser before rendering the webpage). Non-blocking assets are asset files that do not block the critical path (e.g. images).
Next two figures are the charts shown by the Chrome's Developer Tools. In the former, none of the responses were pushed. In the latter, blocking assets were pushed using CASPER.
As can be seen, both
Conclusion
As shown in this blogpost, cache-aware server push can be used by a reverse proxy to push assets while waiting for the backend application server to provide dynamically generated content, effectively hiding the processing time of the application server. Or in case of CDN, it can be used to hide the latency between the edge server and the application server.
Considering how common it is the case that the processing time of an web application (or the RTT between an edge server and an application server) is greater than the RTT between the client and the reverse proxy (or the edge server in case of CDN), we can expect cache-aware server push to provide noticeable improvement to web performance in many deployments.
EDIT: This blogpost is written as part of the http2 Advent Calendar 2015 (mostly in Japanese).
In my earlier blogpost, I wrote that HTTP/2 push does not have significant effect on web performance when serving static files from a single HTTP/2 server. While that is true, push does improve performance by noticeable margin in other scenarios. Let's look into one common case.
The Theory
Many if not most of today's web applications are multi-tiered. Typically, an HTTP request from a client is first accepted by an httpd (either operated by the provider of the web service or by a CDN operator). The httpd serves asset files by itself, while routing requests for HTML documents to application server through fastcgi or HTTP/1.
It is when the response from the application server takes time that HTTP/2 push gives us a big performance boost.
The chart below should be a clear explanation why. With HTTP/2 push, it has become possible for a server to start sending assets that are going to be referred from HTML, before the generated HTML is returned from the application running behind.
Figure 1. Timing sequence of a multi-tiered webapp
(RTT: 50ms, processing-time: 200ms)

(RTT: 50ms, processing-time: 200ms)

It is not uncommon for an web application to spend hundreds of milliseconds processing an HTTP request, querying and updating the database. It is also common for a CDN edge server to wait for hundreds of milliseconds fetching a HTTP response from an web application server through an inter-continental connection.
In case of the chart, RTT between httpd and client is 50ms and the processing time is 200ms. Therefore, the server is capable of spending 4 round-trips (or typically slightly above 200KB of bandwidth1) for pushing asset files before HTML becomes ready to be served.
And thanks to push transactions, the connection will be warm enough by the time when HTML becomes available to the web server, so that the chance of the server being able to send whole document at once becomes bigger.
Theoretically, the upper bound of time reducible by the proposed approach (i.e. push assets until the main document becomes ready) is:
time_reducedmax = processing_time + 1 RTT
The additional 1 RTT appears if HTML being delivered is small that it is incapable of growing the send window in the pull case. time_reducedmin is obviously zero, when no resource that can be pushed exists.Cache-aware Server Push
Even in case you have a time window that can be used to push few hundred kilobytes of data, you would definitely not want to waste the bandwidth by pushing responses already cached by the client.
That is why cache-aware server-pusher (CASPER) becomes important.
Initially implemented as an experimental feature in H2O HTTP2 server version 1.5, CASPER tracks the cache state of the web browser using a single Cookie2. The cookie contains a fingerprint of all the high-priority asset files being cached by the browser compressed using Golomb-compressed sets. H2O updates the fingerprint every time it serves a high-priority asset file, as well as for determining whether certain asset files should be pushed or not.
It should be noted that the current fingerprint maintained by the cookie is at best a poor estimate of what is being cached by the client. Without a way to peek into the web browser cache, we cannot update the fingerprint stored in the cookie to reflect evictions from the cache2. Ideally, web browsers should calculate the fingerprint by itself and send the value to the server. But until then, we have to live with using cookies (or a ServiceWorker-based implementation that would give us freedom in implementing our own cache3) as a hacky workaround.
Benchmark
Let's move on to an experiment to verify if the theory can be applied in practice.
For the purpose, I am using the top page of h2o.examp1e.net. The server (H2O version 1.6.0-beta2 with CASPER enabled; see configuration) is given 50ms simulated latency using
tc qdisc, and a web application that returns index.html with 200ms latency is placed behind the server. Google Chrome 46 is used as the test client.FWIW, the size of the responses being served are as follows:
| File type | Size |
|---|---|
| index.html | 3,619 bytes |
| blocking assets | 319,700 bytes (5 files) |
| non-blocking assets | 415,935 bytes (2 files) |
Next two figures are the charts shown by the Chrome's Developer Tools. In the former, none of the responses were pushed. In the latter, blocking assets were pushed using CASPER.
Figure 3. Chrome Timing Chart without Push


Figure 4. Chrome Timing Chart with Push4


As can be seen, both
DOMContentLoaded and load events are observed around 230 msec earlier when push is being used; which matches the expectation that we would see an improvement of 200 msec to 250 msec.| Event | Without Push (msec) | With Push (msec) | Delta (msec) | Gain |
|---|---|---|---|---|
| DOMContentLoaded | 823 | 595 | 228 | 38% |
| load | 1,010 | 775 | 235 | 30% |
Conclusion
As shown in this blogpost, cache-aware server push can be used by a reverse proxy to push assets while waiting for the backend application server to provide dynamically generated content, effectively hiding the processing time of the application server. Or in case of CDN, it can be used to hide the latency between the edge server and the application server.
Considering how common it is the case that the processing time of an web application (or the RTT between an edge server and an application server) is greater than the RTT between the client and the reverse proxy (or the edge server in case of CDN), we can expect cache-aware server push to provide noticeable improvement to web performance in many deployments.
1: in common case where INITCWND is 10 and MSS is around 1,400 bytes, it is possible to send 150 packets in 4 RTT, reaching 210KB in total
2: fortunately, existence of false-positives in the fingerprint is not a big issue, since the client can simply revert to using ordinary GET request in case push is not used
3: ongoing work is explained in HTTP/2 Push を Service Worker + Cache Aware Server Push で効率化したい話 - Block Rockin' Codes
4: Chromes' timing chart shows pushed streams as being fetched when they are actually being adopted after received
EDIT: This blogpost is written as part of the http2 Advent Calendar 2015 (mostly in Japanese).

Wednesday, December 2, 2015
Using H2O with Let's Encrypt
Let's Encrypt is a new certificate authority that is going to issue certificates for free using automated validation process. They have announced that they will enter public beta on Dec. 3rd 2015.
This blogpost explains how to setup a H2O using the automated process.
Step 1. Install the client
Step 2. Obtain the certificate
If you already have a web server listening to port 80, then run:
Or if you do not have a web server listening on the server, then run:
Step 3. Configure H2O
Setup the configuration file of H2O to use the respective certificate and key files.
That's all. Pretty simple, isn't it?
Kudos to the people behind Let's Encrypt for providing all of these (for free).
For more information, please consult documents on letsencrypt.org and h2o.examp1e.net.
This blogpost explains how to setup a H2O using the automated process.
Step 1. Install the client
% git clone https://github.com/letsencrypt/letsencrypt.git
Step 2. Obtain the certificate
If you already have a web server listening to port 80, then run:
% cd letsencrypt
% ./letsencrypt-auto certonly --webroot \
    --webroot-path $DOCROOT \
    --email $EMAIL \
    --domain $HOST1
$DOCROOT should be the path of the web sever's document root. $EMAIL should be the email address of the website administrator. $HOST should be the hostname of the web server (also the name for which a new certificate will be issued).Or if you do not have a web server listening on the server, then run:
% cd letsencrypt
% ./letsencrypt-auto certonly --standalone \
    --email $EMAIL \
    --domain $HOSTNAME
Issued certificate and automatically-generated private key will be stored under /etc/letsencrypt/live/$HOSTNAME.Step 3. Configure H2O
Setup the configuration file of H2O to use the respective certificate and key files.
listen:
  port: 443
  ssl:
    certificate-file: /etc/letsencrypt/live/$HOSTNAME/fullchain.pem
    key-file: /etc/letsencrypt/live/$HOSTNAME/privkey.pem
Do not forget to replace $HOSTNAMEs within the snippet with your actual hostname.That's all. Pretty simple, isn't it?
Kudos to the people behind Let's Encrypt for providing all of these (for free).
For more information, please consult documents on letsencrypt.org and h2o.examp1e.net.
1: you may also need to use
--server option to obtain a production-ready certificate during the beta process
Wednesday, November 11, 2015
mruby で同期呼出を非同期化する話(もしくは H2O の mruby ハンドラでネットワークアクセスする話)
■背景
H2Oではバージョン1.5より、mrubyを用い、Rackのインターフェイスに則った形でハンドラを書けるようになっています。
この機能を提供している目的は、正規表現による書き換え等を用いる複雑な設定ファイルではなくプログラミング言語を用いることで、ウェブサーバの設定をより簡潔に拡張しやすくするためです(Apacheのmod_rubyやmod_perlのようにウェブアプリケーションをウェブサーバ内で実行可能にすることではありません)。
とは言っても、現実のウェブサーバの設定においては、外部のデータベース等に問い合わせた結果に基づいたルーティングが必要になることがあります。
H2Oのようなイベントドリブンなウェブサーバ上で動作する、同期モデルを採用するRackインターフェイスを用いて記述されるハンドラ内において、データベースへの問い合わせをどのように実現すれば良いか。問い合わせが同期的だと、その間ウェブサーバの処理が止まってしまうので、Rubyで問い合わせ関数が呼ばれたタイミングで、ウェブサーバ側に処理を戻したいわけです。
そんなこんなで
その後、考えたところ、
■Fiberを使って、同期コールを非同期化するPoC
ざっと、以下のような感じになります。Rack ハンドラ自体を Fiber 内に置き、その入出力と、非同期化したい関数(ここでは
やろうと思えばできることはわかりました。しかし、この手法には制限が2点あります。
■プロトコルバインディングの実装手法
さて、これで行けそうだということは分かったのですが、可能であることと、それが良いアプローチであることが等価であるとは限りません。そもそも、プロトコルバインディングはどのように書かれるべきなのでしょうか。2種類に大別してプロコンを書きたいと思います。
個人的には、rubyでバインディングを書くアプローチが好みです。速度が遅いかも…という点については、Perl IO を用いた HTTP 実装を推進してきた立場から言うと、スクリプト言語のI/Oレイヤの負荷はネットワーク通信を行うプログラムにおいては多くの場合問題にならないと考えます。問題になるとすれば、通信データのパーサですが、ここのみをネイティブコード化するという手法で十分に対応できることは、Plack や Furl に慣れた Perl プログラマであれば納得できる話かと思いますし、(m)ruby においても同等かと思います。
■まとめ
長くなりましたが、H2O (あるいはイベントドリブンなプログラム一般)から、同期的に書かれたネットワーククライアントを呼び出す mruby スクリプトを起動する方法については、
H2Oではバージョン1.5より、mrubyを用い、Rackのインターフェイスに則った形でハンドラを書けるようになっています。
この機能を提供している目的は、正規表現による書き換え等を用いる複雑な設定ファイルではなくプログラミング言語を用いることで、ウェブサーバの設定をより簡潔に拡張しやすくするためです(Apacheのmod_rubyやmod_perlのようにウェブアプリケーションをウェブサーバ内で実行可能にすることではありません)。
とは言っても、現実のウェブサーバの設定においては、外部のデータベース等に問い合わせた結果に基づいたルーティングが必要になることがあります。
H2Oのようなイベントドリブンなウェブサーバ上で動作する、同期モデルを採用するRackインターフェイスを用いて記述されるハンドラ内において、データベースへの問い合わせをどのように実現すれば良いか。問い合わせが同期的だと、その間ウェブサーバの処理が止まってしまうので、Rubyで問い合わせ関数が呼ばれたタイミングで、ウェブサーバ側に処理を戻したいわけです。
そんなこんなで
そのとおりです。mrubyの構造上、Cライブラリ呼出のタイミングで非同期化するの難しそう>「mrubyのコード中でredisへのアクセスが発生した際にh2oがそのスレッドを開放できず、イベントループの恩恵が得られてない」 https://t.co/suTAf8PatM
— Kazuho Oku (@kazuho) November 10, 2015@kazuho むむむ、どういう改善をすれば「恩恵を得られる」ようになりますかね。改善する意志はあります。
— Yukihiro Matsumoto (@yukihiro_matz) November 10, 2015@yukihiro_matz @kazuho CからFiberいじれるようにするとかそういう話ですかね。
— MATSUMOTO, Ryosuke (@matsumotory) November 10, 2015@matsumotory @kazuho yieldとresumeはできますが。後はなにが必要ですか? 作るのはC関数に再入できない問題がありますが、resume同様returnでしか呼べない制限をつければ可能ですね
— Yukihiro Matsumoto (@yukihiro_matz) November 10, 2015その後、考えたところ、
@matsumotory @yukihiro_matz rack handlerをfiber内から呼ぶようにすれば、ひょっとしてmrubyに手を入れずに対応できるんじゃないかと考えています
— Kazuho Oku (@kazuho) November 10, 2015■Fiberを使って、同期コールを非同期化するPoC
ざっと、以下のような感じになります。Rack ハンドラ自体を Fiber 内に置き、その入出力と、非同期化したい関数(ここでは
DB#query)が呼ばれたタイミングで Fiber.yield を呼ぶことで、メインループ(これは実際には C で書くことになる)へ制御を戻しています。# DB class that calls yield
class DB
def query
return Fiber.yield ["db#query"]
end
end
# the application, written as an ordinary Rack handler
app = lambda {|env|
p "received request to #{env["PATH_INFO"]}"
[200, {}, ["hello " + DB.new.query]]
}
# fiber that runs the app
runner = Fiber.new {
req = Fiber.yield
while 1
resp = app.call(req)
req = Fiber.yield ["response", resp]
end
}
runner.resume
# the app to be written in C
msg = {"PATH_INFO"=> "/abc"} # set request obj
while 1
status = runner.resume(msg)
if status[0] == "response"
resp = status[1]
break
elsif status[0] == "db#query"
# is a database query, return the result
msg = ""
else
raise "unexpected status:#{status[0]}"
end
end
p "response:" + resp[2].join("") やろうと思えばできることはわかりました。しかし、この手法には制限が2点あります。
- fiber 内からしか呼べない - それでいいのか?
- fiber 内で、Cコードを経由して呼ばれた ruby コードから Fiber.yield できない
■プロトコルバインディングの実装手法
さて、これで行けそうだということは分かったのですが、可能であることと、それが良いアプローチであることが等価であるとは限りません。そもそも、プロトコルバインディングはどのように書かれるべきなのでしょうか。2種類に大別してプロコンを書きたいと思います。
- Cライブラリのラッパーを書く
- Cライブラリが、非同期モデルをサポートしている必要がある
- イベントループ (libuv, libev, ...) 毎に対応が必要
- プロトコルを実装しなくて良い
- rubyでバインディングを書く
- プロトコルを実装する必要がある
- rubyで書ける!
- 各バックエンド (libuv, libev, ngx_mruby, h2o, ...) が同じ ruby API (TCPSocketのサブセットで良いと思う) を提供すれば、イベントループ毎の対応が不要
- Cより遅いかも…
個人的には、rubyでバインディングを書くアプローチが好みです。速度が遅いかも…という点については、Perl IO を用いた HTTP 実装を推進してきた立場から言うと、スクリプト言語のI/Oレイヤの負荷はネットワーク通信を行うプログラムにおいては多くの場合問題にならないと考えます。問題になるとすれば、通信データのパーサですが、ここのみをネイティブコード化するという手法で十分に対応できることは、Plack や Furl に慣れた Perl プログラマであれば納得できる話かと思いますし、(m)ruby においても同等かと思います。
■まとめ
長くなりましたが、H2O (あるいはイベントドリブンなプログラム一般)から、同期的に書かれたネットワーククライアントを呼び出す mruby スクリプトを起動する方法については、
- 同期的に記述されたアプリケーションを Fiber を使ったラッパーで非同期化する
- ホストプログラムは、Fiber を通じて、TCPSocket と互換性のある同期ソケット API を提供する
- プロトコルバインディングは、Rubyで(もしくは、Ruby の TCPSocket と C で書かれたプロトコルパーサを組み合わせて)提供する
")
Friday, November 6, 2015
ソート済の整数列を圧縮する件
圧縮されたソート済の整数列ってのは汎用的なデータ構造で、たとえば検索エンジンの転置インデックスとか、いろんなところで使うわけです。で、検索エンジンの場合は速度重要なので、PForDeltaとか様々なデータ構造が研究されてる。
一方、H2O には、ブラウザキャッシュに載ってない js や css をサーバプッシュする仕組み「cache-aware server push」があって、何がキャッシュされているか判定するためにブルームフィルタを全ての HTTP リクエストに含める必要がある。
で、ブルームフィルタを圧縮しようと思うと、ブルームフィルタってのはソート済の整数列として表現できるので、これを圧縮しようって話になる。
検索エンジン等で使う場合は速度重要だけど、HTTPリクエストに載せる場合は空間効率のほうが重要になる。ってことで、空間効率が理論限界に近いゴロム符号(の特殊系であるライス符号)を使うことになる。
ってことで、作ったのがgithub.com/kazuho/golombset。
今週ちょっとcodecをいじって、あと気軽に試せるようにコマンドラインインターフェイスを追加した。
なので、こいつを git clone して make して、以下のような感じで使うことができる。
(100, 155, 931) というソート済の整数列をエンコード
同じ整数列をエンコードしてデコード
(100,155,931)という3つの数値を含むソート済の整数列を5バイトにエンコードできていることがわかる。
もうちょっと実際的な例として、偽陽性が1/100の確率で発生するブルームフィルタに、100個の要素を突っ込むんでエンコードすることを考える。適当にランダムな値を用いてそのようなフィルタを作成しエンコードしてみると、結果が102バイトであることがわかる。
つまり、CSSやJavaScriptのような、ブラウザのレンダリングにクリティカルな影響を与えるファイルが100個あるとして、それらがウェブブラウザのキャッシュ内に存在するかを判定するためのブルームフィルタをHTTPリクエストに添付するためのオーバーヘッドは100バイト程度である、ということになる。さらに、リクエストを2回以上繰り返す場合は、HPACKによる圧縮が効く。
以上が、これなら現実的だよねってんで H2O の cache-aware server push は実装されたのでした、という経緯と、それにあわせて作ったライブラリの紹介でした。
それでは、また。
参考:
ImperialViolet - Smaller than Bloom filters
Golomb-coded sets: smaller than Bloom filters (giovanni.bajo.it)
一方、H2O には、ブラウザキャッシュに載ってない js や css をサーバプッシュする仕組み「cache-aware server push」があって、何がキャッシュされているか判定するためにブルームフィルタを全ての HTTP リクエストに含める必要がある。
で、ブルームフィルタを圧縮しようと思うと、ブルームフィルタってのはソート済の整数列として表現できるので、これを圧縮しようって話になる。
検索エンジン等で使う場合は速度重要だけど、HTTPリクエストに載せる場合は空間効率のほうが重要になる。ってことで、空間効率が理論限界に近いゴロム符号(の特殊系であるライス符号)を使うことになる。
ってことで、作ったのがgithub.com/kazuho/golombset。
今週ちょっとcodecをいじって、あと気軽に試せるようにコマンドラインインターフェイスを追加した。
なので、こいつを git clone して make して、以下のような感じで使うことができる。
% (echo 100; echo 155; echo 931) | ./golombset --encode | od -t x1
0000000    41  90  6d  c0  ff
0000005
% (echo 100; echo 155; echo 931) | ./golombset --encode | ./golombset --decode
100
155
931
(100,155,931)という3つの数値を含むソート済の整数列を5バイトにエンコードできていることがわかる。
もうちょっと実際的な例として、偽陽性が1/100の確率で発生するブルームフィルタに、100個の要素を突っ込むんでエンコードすることを考える。適当にランダムな値を用いてそのようなフィルタを作成しエンコードしてみると、結果が102バイトであることがわかる。
% perl -MList::MoreUtils=uniq -e 'my @a = (); while (@a < 100) { @a = uniq sort { $a <=> $b } (@a, int rand(10000)); } print "$_\n" for @a' | ./golombset --encode | wc -c
     102
つまり、CSSやJavaScriptのような、ブラウザのレンダリングにクリティカルな影響を与えるファイルが100個あるとして、それらがウェブブラウザのキャッシュ内に存在するかを判定するためのブルームフィルタをHTTPリクエストに添付するためのオーバーヘッドは100バイト程度である、ということになる。さらに、リクエストを2回以上繰り返す場合は、HPACKによる圧縮が効く。
以上が、これなら現実的だよねってんで H2O の cache-aware server push は実装されたのでした、という経緯と、それにあわせて作ったライブラリの紹介でした。
それでは、また。
参考:
ImperialViolet - Smaller than Bloom filters
Golomb-coded sets: smaller than Bloom filters (giovanni.bajo.it)

Thursday, October 22, 2015
Performance improvements with HTTP/2 push and server-driven prioritization
tl;dr
HTTP/2 push only marginally improves web-site performance (even when it does). But it might provide better user experience over mobile networks with TCP middleboxes.
Introduction
Push is an interesting feature of HTTP/2.
By using push, HTTP servers can start sending certain asset files that block rendering (e.g. CSS and script files) before the web browser issues requests for such assets. I have heard (or spoken myself of) anticipations that by doing so we might be able to cut down the response time of the Web.
CASPER (cache-aware server pusher)
The biggest barrier in using HTTP/2 push has so far been considered cache validation.
For the server to start pushing asset files, it needs to be sure that the client does not already have the asset cached. You would never want to push a asset file that is already been cached by the client - doing so not only will waste the bandwidth but also cause negative effect on response time. But how can a server determine the cache state of the client without spending an RTT asking to the client?
That's were CASPER comes in.
CASPER (abbreviation for cache-aware server pusher) is a function introduced in H2O version 1.5, that tracks the cache state of the web browser using a single Cookie. The cookie contains a fingerprint of all the high-priority asset files being cached by the browser compressed using Golomb-compressed sets.
The cookie is associated with every request sent by the client1. So when the server receives a request to HTML, it can immediately determine whether or not the browser is in possession of the blocking assets (CSS and script files) required to render the requested HTML. And it can push the only files that are known not to be cached.
With CASPER, it has now become practical to use HTTP/2 push for serving asset files.
Using HTTP/2 push in H2O
This week, I have started using CASPER on h2o.examp1e.net - the tiny official site of H2O.
The configuration looks like below. The mruby handler initiates push of JavaScript and CSS files if the request is against the top page or one of the HTML documents, and then (by using
The benchmark
With the setting above (with

First, let's look at the first two rows that have
Next, let's compare the first two rows (push:off) with the latter two (push:off). It is interesting that
The fact will have both positive and negative effects to user experience; the positive side is that time user sees a blank screen decreases substantially (the red section - time spent after unload before first-paint). The negative side is that users would need to wait longer until he/she knows that the server has responded (by the browser starting to render the next page).
It is not surprising that turning on push only somewhat improves the first-paint timing compared to both being turned off; the server is capable of sending more CSS and JavaScript before it receives request for image files, and start interleaving the responses with them.
On the other hand, it might be surprising that using push together with reprioritization did not cause any differences. The reason is simple; in this scenario, transferring the necessary assets and the <head> section of the HTML (in total about 320KB) required about 10 round trips (including overhead required by TCP, TLS, HTTP/2). With this much roundtrips, the merit of push can hardly be observed; considering the fact that push is technique to eliminate one round trip necessary for the browser to issue requests for the blocking assets4.
Conclusion
The benchmark reinforces the claims made by some that HTTP2 push will only have marginal effect on web performance5. The results have been consistent with expectations that using push will only optimize the web performance by 1 RTT at maximum, and it would be hard to observe the difference considering the effect of TCP slow start and how many roundtrips are usually required to render a web page.
This means to the users of H2O (with reprioritization turned on by default) that they can expect near-best performance without using push.
On the other hand, we may still need to look at networks having TCP proxies. As discussed in Why TCP optimisation has become more important than content optimization (devcentral.f5.com) some mobile carriers do seem to have such middlebox installed.
Existence of such device is generally a good thing since it not only reduces packet retransmits but also improves TCP bandwidth during the slow-start phase. But the downside is that their existence usually increase application-level RTT, since they expand the amount of data in-flight, which has a negative impact on the responsiveness of HTTP/2. HTTP/2 push will be a good optimization under such network conditions.
Notes:
1. the fingerprint contained in the Cookie header is efficiently compressed by HPACK
2. wpbench was used to collect the numbers; first-paint was calculated as
3. starting from H2O version 1.5,
4. at 10 RTT it is unlikely that we have hit the maximum network bandwidth, and that means that packets will be received by the browser in batch every RTT
5. there are use cases for HTTP/2 push other than pushing asset files
HTTP/2 push only marginally improves web-site performance (even when it does). But it might provide better user experience over mobile networks with TCP middleboxes.
Introduction
Push is an interesting feature of HTTP/2.
By using push, HTTP servers can start sending certain asset files that block rendering (e.g. CSS and script files) before the web browser issues requests for such assets. I have heard (or spoken myself of) anticipations that by doing so we might be able to cut down the response time of the Web.
CASPER (cache-aware server pusher)
The biggest barrier in using HTTP/2 push has so far been considered cache validation.
For the server to start pushing asset files, it needs to be sure that the client does not already have the asset cached. You would never want to push a asset file that is already been cached by the client - doing so not only will waste the bandwidth but also cause negative effect on response time. But how can a server determine the cache state of the client without spending an RTT asking to the client?
That's were CASPER comes in.
CASPER (abbreviation for cache-aware server pusher) is a function introduced in H2O version 1.5, that tracks the cache state of the web browser using a single Cookie. The cookie contains a fingerprint of all the high-priority asset files being cached by the browser compressed using Golomb-compressed sets.
The cookie is associated with every request sent by the client1. So when the server receives a request to HTML, it can immediately determine whether or not the browser is in possession of the blocking assets (CSS and script files) required to render the requested HTML. And it can push the only files that are known not to be cached.
With CASPER, it has now become practical to use HTTP/2 push for serving asset files.
Using HTTP/2 push in H2O
This week, I have started using CASPER on h2o.examp1e.net - the tiny official site of H2O.
The configuration looks like below. The mruby handler initiates push of JavaScript and CSS files if the request is against the top page or one of the HTML documents, and then (by using
399 status code) delegates the request to the next handler (defined by file.dir directive) that actually returns a static file. http2-casper directive is used to turn CASPER on, so that the server will discard push attempts initiated by the mruby handler for assets that are likely cached. http2-reprioritize-blocking-assets is a performance tuning option that raises the priority of blocking assets to highest for web browsers that do not."h2o.examp1e.net:443":
paths:
"/":
mruby.handler: |
lambda do |env|
push_paths = []
if /(\/|\.html)$/.match(env["PATH_INFO"])
push_paths << "/search/jquery-1.9.1.min.js"
push_paths << "/search/oktavia-jquery-ui.js"
push_paths << "/search/oktavia-english-search.js"
push_paths << "/assets/style.css"
push_paths << "/assets/searchstyle.css"
end
return [
399,
push_paths.empty? ?
{} :
{"link" => push_paths.map{|p| "<#{p}>; rel=preload"}.join("\n")},
[]
]
end
file.dir: /path/to/doc-root
http2-casper: ON
http2-reprioritize-blocking-assets: ONThe benchmark
With the setting above (with
http2-reprioritize-blocking-assets both OFF and ON), I have measured unload, first-paint, and load timings2 using Google Chrome 46, and the numbers are as follows. The RTT between the server and the client was ~25 milliseconds. The results were mostly reproducible between multiple attempts.
First, let's look at the first two rows that have
push turned off. It is evident that reprio:on3 starts rendering the response 50 milliseconds earlier (2 RTT). This is because unless the option is turned on, the priority tree created by Chrome instructs the web browser to interleave responses containing CSS / JavaScript with those containing image files.Next, let's compare the first two rows (push:off) with the latter two (push:off). It is interesting that
unload timings have moved towards right. This is because when push is turned on, the contents of the asset files are sent before the contents of the HMTL. Since web browsers unload the previous page when it receives the first octets of the HTML file, using HTTP/2 push actually increases the time spent until the previous page is unloaded.The fact will have both positive and negative effects to user experience; the positive side is that time user sees a blank screen decreases substantially (the red section - time spent after unload before first-paint). The negative side is that users would need to wait longer until he/she knows that the server has responded (by the browser starting to render the next page).
It is not surprising that turning on push only somewhat improves the first-paint timing compared to both being turned off; the server is capable of sending more CSS and JavaScript before it receives request for image files, and start interleaving the responses with them.
On the other hand, it might be surprising that using push together with reprioritization did not cause any differences. The reason is simple; in this scenario, transferring the necessary assets and the <head> section of the HTML (in total about 320KB) required about 10 round trips (including overhead required by TCP, TLS, HTTP/2). With this much roundtrips, the merit of push can hardly be observed; considering the fact that push is technique to eliminate one round trip necessary for the browser to issue requests for the blocking assets4.
Conclusion
The benchmark reinforces the claims made by some that HTTP2 push will only have marginal effect on web performance5. The results have been consistent with expectations that using push will only optimize the web performance by 1 RTT at maximum, and it would be hard to observe the difference considering the effect of TCP slow start and how many roundtrips are usually required to render a web page.
This means to the users of H2O (with reprioritization turned on by default) that they can expect near-best performance without using push.
On the other hand, we may still need to look at networks having TCP proxies. As discussed in Why TCP optimisation has become more important than content optimization (devcentral.f5.com) some mobile carriers do seem to have such middlebox installed.
Existence of such device is generally a good thing since it not only reduces packet retransmits but also improves TCP bandwidth during the slow-start phase. But the downside is that their existence usually increase application-level RTT, since they expand the amount of data in-flight, which has a negative impact on the responsiveness of HTTP/2. HTTP/2 push will be a good optimization under such network conditions.
Notes:
1. the fingerprint contained in the Cookie header is efficiently compressed by HPACK
2. wpbench was used to collect the numbers; first-paint was calculated as
max(head-parsed, css-loaded); in this benchmark, DOMContentLoaded timing was indifferent to first-paint3. starting from H2O version 1.5,
http2-reprioritize-blocking-assets option is turned on by default4. at 10 RTT it is unlikely that we have hit the maximum network bandwidth, and that means that packets will be received by the browser in batch every RTT
5. there are use cases for HTTP/2 push other than pushing asset files

Thursday, October 8, 2015
雑なツイートをしてしまったばかりにrubyを高速化するはめになった俺たちは!
逆に言うと、Rubyの文字列型の内部実装がropeになれば、freezeしてもしなくても変わらない速度が出るようになって、結局freezeする必要なんてなかったんやーで丸く収まるんじゃないの?と思いました #雑な感想
— Kazuho Oku (@kazuho) October 6, 2015@kazuho 文字列を弄る話じゃなくて、文字列の identity の話なので、ちょっと関係ないかなぁ、と
— _ko1 (@_ko1) October 6, 2015で、まあ、いくつか気になる点があったので手をつけてしまいました。
1. オブジェクト生成のホットパスの最適化
ホットスポットだとされていたところのコードを読んでると、オブジェクト生成の際に走る関数が割と深いのが問題っぽかった。通常実行されるパスは短いから、それにあわせて最適なコードがはかれるようにコードを調整すれば速くなるはず!!!
とコンセプトコードを書いて投げたら取り込まれた。やったね!!!
と思ったら、ほとんど速くなってないっぽい。これは悲しい…ということで、細かな修正を依頼。
このPR適用すると、問題のマイクロベンチマークが3%〜5%くらい速くなるっぽい。
2. ヒープページのソートをやめる
通常実行される側をいじっても期待ほど速度が上がらなかったので、これは遅い側に原因があるかも…って見ていて気になったのが、ヒープページをソートする処理。現状のRubyは、オブジェクトを格納する「ヒープページ」を16KB単位で確保するんだけど、これを逆参照できるように、アドレスでソートした一覧を持ってる。この構築コストがでかい。
で、これをヒープに書き直してみたところ、rdocを使ったベンチマークで2〜3%の高速化が確認できたので報告。
.@_ko1 気になったので、heap tableを雑にハッシュ化してみましたが、rdocで2〜3%実行時間が減ります(高速化します)ね https://t.co/CJhierZZN3
— Kazuho Oku (@kazuho) October 7, 2015ただ、今日のRubyは、(昔読んだ記事とは異なり)ヒープページが16KB単位でアラインされているということなので、ヒープを使うよりもビットマップを使うべき案件。
3. スイープの最適化
ヒープページのソートを書き直したあとでプロファイラの出力を眺めていたら、GCのスイープ処理が重たいことに気づいた。コードを読んだところ、分岐回数と呼出深度の両面で改善が望めそうだったので、ざっくりやったところ、やはり2〜5%程度実行時間の短縮ができた。ので、これはPRとして報告。
この3つを組み合わせると、rdocみたいな実アプリケーションの実行時間が、手元で5%以上縮みそう!注1 ってことで満足したのがここ二日間の進捗です!!!!!!! なんかいろいろ滞っているような気がしますがすみああおえtぬさおえうh
これからは雑なツイートを慎みたいと思います。
注1: バグがなければ!!

Tuesday, October 6, 2015
[メモ] OS XのホストからVMにnfsでファイル共有
普段OS X上で作業しつつ、開発ディレクトリをOS X上のVMで動いているLinuxやFreeBSDからもアクセスできるようにしてあると、互換性検証がはかどる。
どう設定するか、備忘録をかねてメモ。
1. ゲスト側で通常使用するアカウントのuser-id,group-idを、OS Xのそれに揃える
2. OS Xの/etc/exportsと/etc/nfs.confを以下のように、TCP経由でVMの仮想ネットワークにだけファイルを公開するよう設定
注. VMware Fusion 10の場合は、環境設定から、新しいネットワークを作成し、「NATを使用する」を外し、そのネットワークを使う必要がある。そうしない限り、ホストに見えるTCPのソースアドレスがローカルネットワークのものにならない。
できるだけ単純に構成しようとすると、こんな感じになるかな、と。設定に問題があるようだったら教えてください。
どう設定するか、備忘録をかねてメモ。
1. ゲスト側で通常使用するアカウントのuser-id,group-idを、OS Xのそれに揃える
2. OS Xの/etc/exportsと/etc/nfs.confを以下のように、TCP経由でVMの仮想ネットワークにだけファイルを公開するよう設定
/etc/exports:
/shared-dir -mapall=user:group -network netaddr -mask netmask

/etc/nfs.conf:
nfs.server.udp=0
nfs.server.tcp=1
3. ゲスト側の/etc/fstabにマウント情報を設定
192.168.140.1:/shared-dir /shared-dir nfs rw,noatime 1 0これで、ホストでも、どのVMでも、
/shared-dirの中身が同じになる。注. VMware Fusion 10の場合は、環境設定から、新しいネットワークを作成し、「NATを使用する」を外し、そのネットワークを使う必要がある。そうしない限り、ホストに見えるTCPのソースアドレスがローカルネットワークのものにならない。
できるだけ単純に構成しようとすると、こんな感じになるかな、と。設定に問題があるようだったら教えてください。
![はてなブックマーク - [メモ] OS XのホストからVMにnfsでファイル共有](http://b.hatena.ne.jp/entry/image/http://blog.kazuhooku.com/2015/10/os-xvmnfs.html "はてなブックマーク - [メモ] OS XのホストからVMにnfsでファイル共有")
Thursday, October 1, 2015
ウェブページの描画 (first-paint) までの時間を測定するツールを作った件、もしくはHTTP2時代のパフォーマンスチューニングの話
ウェブページの表示までにかかる時間をいかに短くするかってのは、儲かるウェブサイトを構築する上で避けて通れない、とても重要な要素です。
少し古いデータとしては、たとえば、ウェブページの表示が500ミリ秒遅くなると広告売上が1.2%低下するというBingの例なんかも知られているわけです。
「ウェブページの表示までにかかる時間」と言った場合、実際には以下のようないくつかのメトリックがあります。
ウェブサイトチューニングにおいては、
ですが、残念なことに、first-paintまでの時間をAPIを用いて取得できるウェブブラウザは一部に限られています(参照:「Webページ遷移時間のパフォーマンス「First Paint」を計測する方法」)。また、測定にあたって、運用中のウェブページに変更を加えたくない、ということもあったりします。
wpbenchは、これら2点の問題を解消するベンチマークツールです。
wpbenchは、たった1枚のHTMLファイルです。このHTMLファイルを自分のウェブサイトに追加するだけで、そのサイト上の任意のページの表示までにかかる時間が測定可能になります。また、
HTTP/1.1を使っている場合、これらパフォーマンスメトリックは、専らネットワーク状況とウェブブラウザのみに依存して決まる値でした。しかし、HTTP/2では、ウェブブラウザとウェブサーバが恊働して、アセットの転送順序を制御することができるようになった結果、使用するウェブサーバによってパフォーマンスが大幅に変わる、という状況が産まれはじめています。
たとえば、HTTP2サーバ「H2O」のベンチマークページを見ていただくと、ウェブサーバによってfirst-paintまでの時間が倍近く異なるケースがあることがお分かりいただけるかと思います。
既にパフォーマンスチューニング済のウェブサイトを管理している方々も、HTTPS、あるいはHTTP/2への対応にあたり、いま一度、ウェブサイトの表示速度を確認されることをおすすめいたします。
少し古いデータとしては、たとえば、ウェブページの表示が500ミリ秒遅くなると広告売上が1.2%低下するというBingの例なんかも知られているわけです。
「ウェブページの表示までにかかる時間」と言った場合、実際には以下のようないくつかのメトリックがあります。
| イベント | 意味 |
|---|---|
| unload | 現在のページからの離脱。離脱後、first-paintまでは真っ白な表示になります |
| first-paint | ウェブページの初回描画(HTMLの後半や画像は存在しない可能性があります) |
| DOMContentLoaded | ウェブページのレイアウト完了 |
| load (onload) | 画像等を含む全データの表示完了 |
ウェブサイトチューニングにおいては、
- ユーザができるだけ早くウェブページを閲覧し始めることができるよう、first-paintの値を小さくすることを第一の目標注1
- 全データができるだけ早く揃うよう、loadの値を小さくすることを第二の目標
ですが、残念なことに、first-paintまでの時間をAPIを用いて取得できるウェブブラウザは一部に限られています(参照:「Webページ遷移時間のパフォーマンス「First Paint」を計測する方法」)。また、測定にあたって、運用中のウェブページに変更を加えたくない、ということもあったりします。
wpbenchは、これら2点の問題を解消するベンチマークツールです。
wpbenchは、たった1枚のHTMLファイルです。このHTMLファイルを自分のウェブサイトに追加するだけで、そのサイト上の任意のページの表示までにかかる時間が測定可能になります。また、
body.clientHeightをポリングするという力技により、FirefoxやChromeのようなfirst-paint取得のためのAPIを提供しないウェブブラウザにおいても、その値を取得、表示することができます。HTTP/1.1を使っている場合、これらパフォーマンスメトリックは、専らネットワーク状況とウェブブラウザのみに依存して決まる値でした。しかし、HTTP/2では、ウェブブラウザとウェブサーバが恊働して、アセットの転送順序を制御することができるようになった結果、使用するウェブサーバによってパフォーマンスが大幅に変わる、という状況が産まれはじめています。
たとえば、HTTP2サーバ「H2O」のベンチマークページを見ていただくと、ウェブサーバによってfirst-paintまでの時間が倍近く異なるケースがあることがお分かりいただけるかと思います。
既にパフォーマンスチューニング済のウェブサイトを管理している方々も、HTTPS、あるいはHTTP/2への対応にあたり、いま一度、ウェブサイトの表示速度を確認されることをおすすめいたします。
注1: ブラウザによってはfirst-paintのタイミングを取得できないため、DOMContentLoadedを使うこともありますが、DOMContentLoadedには<body>末尾に配置する統計系のスクリプトの読み込みにかかる時間等が加算される点等、注意が必要になります。また、画像なしに閲覧が不可能なサイトについては、Above the foldの値をチューニングする必要があります
 までの時間を測定するツールを作った件、もしくはHTTP2時代のパフォーマンスチューニングの話")
Wednesday, September 30, 2015
H2O version 1.5.0 released
Today, I am happy to announce the release of H2O version 1.5.0.
Notable improvements from 1.4 series are as follows:
On-the-fly gzip support
This was a feature requested by many people, and I would like to thank Justin Zhu for doing the hard work!
mruby-based scripting
Server-side scripting using mruby is now considered production level.
And now that the our API is base on Rack, it would be easy for Ruby programmers to use / learn, thanks to its excellent design and documentation.
For this part, my thank you goes to Ryosuke Matsumoto, Masayoshi Takahashi, Masaki TAGAWA.
cache-aware server push
Server-push is an important aspect of HTTP/2, however it has generally believed to be hard to use, since web application do not have the knowledge of what has already been cached on the client-side.
With the help of Ilya Grigorik and the Japanese HTTP/2 community, we have essentially solved the issue by introducing cache-aware server push; the server is now capable of tracking the what the web browser has in its cache, and determine whether or not a resource should be pushed!
We plan to improve the feature in the upcoming releases so that the Web can be even faster!
isolation of private keys
H2O now implements privilege isolation for handling RSA private key operations so that SSL private keys would not leak in case of vulnerabilities such as Heartbleed.
In the upcoming days I will post several blogposts explaining the notable changes. Stay tuned.

Thursday, September 24, 2015
Neverbleed - RSAの秘密鍵演算を別プロセスに分離する話
機能毎にプロセスを分割し、それらを別個の権限のもとで実行することで、脆弱性があった場合の影響を抑え込むというのは、一定以上の規模をもつプログラムでは、しばしば見られるデザインパターンです。
qmailは、そのような設計がなされたメール配送デーモンとして名高いですし、OpenSSHもまた、認証プロセスと通信プロセスを分離することで、外部との通信を担当するコードにバグがあったとしても、ルート権限が奪われないように設計されています(参照: Privilege Separated OpenSSH)。
一方で、OpenSSLにはそのような権限分離は実装されていません。Heartbleedの際にサーバの秘密鍵が漏洩したのも、秘密鍵の取り扱いと、その他の通信の取り扱いを同一のメモリ空間の中で行っていたからだと考えることができます。
ないのなら、自分で作ればいいじゃない…ということで作りました。それが、Neverbleedです。
Neverbleedは、OpenSSLの拡張インターフェイスであるEngineを利用して、RSA秘密鍵を用いる処理を専用プロセスに分離します。OpenSSLの初期化時に専用プロセスを起動し、秘密鍵の読み込みと関連演算は全て専用プロセスで行われるため、OpenSSLを利用するサーバプロセスに脆弱性があったとしても秘密鍵が漏洩することはありません。
OpenSSLの拡張インターフェイスを利用しているため、OpenSSLへの変更は不要ですし、サーバプログラムへの変更もごく少量ですみます。また、専用プロセスとの通信のオーバーヘッドはRSAの秘密鍵演算と比べると非常に小さいため、そのオーバーヘッドは問題になりません。
そんな感じでうまく動いているので、Neverbleedは、今月リリース予定のH2Oバージョン1.5に組み込まれる予定です。
参照: http://www.citi.umich.edu/u/provos/ssh/privsep.html

Wednesday, September 16, 2015
Directory traversal vulnerability found in H2O
A directory traversal vulnerability has been found in H2O. Users are advised to update immediately.
https://h2o.examp1e.net/vulnerabilities.html#CVE-2015-5638
EDIT. I am sorry to have included an information leakage vulnerability in my software. Information leakage vulnerability consists of two categories: file leakage and memory leakage. Today we have fixed the former; there are no known vulnerabilities that need to be fixed.
However, considering the fact that it is hard to prove that there is no memory leakage vulnerability, we are going to implement privilege separation for handling TLS private keys in the upcoming 1.5 release just in case so that the private keys would not get exposed even if such vulnerability exist.

Thursday, July 23, 2015
前方秘匿性 (forward secrecy) をもつウェブサイトの正しい設定方法
前方秘匿性(forward secrecy)とは、以下のような性質を指します。
鍵が攻撃者や諜報機関など第三者の知るところとなった場合でも、それまで通信していた暗号文が解読されないようにしないといけない、という考え方とともに、最近 HTTPS を利用するウェブサイトにおいても導入が求められるようになってきた概念です。
前方秘匿性を満たすウェブサイトの設定方法については、TLSの暗号化方式をECDH_RSAあるいはECDHE_RSAに設定すれば良い、と述べている文献が多いです。
ですが、ほとんどのウェブサーバにおいて、それは誤りです。
なぜか。
通信を暗号化する鍵(セッション鍵)の確立にDHEあるいはECDHEを用いれば前方秘匿性が確保されるというのは、鍵交換に議論を限ってしまえば正しいです。
しかし、TLSプロトコルには、鍵交換以外にセッション鍵を保存し、再利用する仕組みが存在します。Session ResumptionとSession Ticketの2つがそれに該当します。
このうち、OpenSSLが標準でサポートし、ウェブブラウザが対応している場合(IE9以前とMobile Safari以外の全ての主要ウェブブラウザが該当します)にSession Resumptionより優先して利用されるSession Ticketは、セッション鍵をサーバのみが知るマスターキーで暗号化して、クライアントに送信します。
セッション鍵をマスターキーで暗号化…いやな響きがしませんか?
そうです。このSession Ticketの暗号化に使われるマスターキーを定期的に更新しない限り、マスターキーが流出してしまった場合、過去の通信内容がすべて解読されてしまうことになるのです。
しかし残念なことに、ほとんどのウェブサーバは、マスターキーを自動的に更新する仕組みをそなえていません。
では、どのようにサーバを設定すればいいでしょうか。
解決策1. Session Ticket機能を無効化する
第一の解決策はウェブサーバの設定でSession Ticket機能を無効化することです。Apache の場合は SSLSessionTickets、nginx の場合は ssl_session_tickets という設定コマンドを使うことで、無効化することができます。
しかし、nginx (とevent mpmを使用するApache)は、複数サーバにまたがる session resumption 機能を実装していません。そのため、ロードバランサの背後に複数のHTTPSサーバを立てている場合は、session ticket をオフにすると、新規接続確立のたびにTLSハンドシェイクが発生し、ユーザの体感速度の低下やサーバの負荷増大につながってしまいます。
解決策2. サーバを定期的に再起動する
ApacheやNginxは、サーバを起動するタイミングで Session Ticket のマスターキーを再生成します。なので、たとえば1時間に1回サーバを再起動すれば、前方秘匿性を確保しつつ Session Ticket を使うことができます。簡単ですね!!!
なお、ロードバランサの背後に複数のHTTPSサーバを立てている場合は、それらのサーバを再起動する度に、新しいマスターキーが記述された設定ファイルを再配布する必要があります。このへんは Twitter さんの涙ぐましい努力の話があるので、それを参考にがんばりましょう。
解決策3. H2O を使う
これまで述べてきたように、これまでのウェブサーバの前方秘匿性のサポートはお粗末と言わざるをえません(他にも、マスターキーの強度が強力なセッションキーよりも弱いといった問題も存在します)。
そこで H2O ですよ!!!!
私たちが開発しているH2Oの最新バージョンは、これらの問題を全て解決しています。
具体的に言うと、
・Session Ticket のマスターキーは、他のサーバのように AES-128 ではなく AES-256 です
・Session Ticket は自動的に更新されます(デフォルト15分間隔)
・ロードバランサの背後に複数台のH2Oを設置する場合、Session Ticketをmemcachedで共有するように設定することが可能です
・ついでに、Memcached を用いた複数サーバにまたがるSession Resumptionにも対応しているので、Mobile Safari でのHTTPSアクセスも高速に処理することができます
というわけで、安全なウェブサイトを構築したい人は H2O 使えばいいんじゃないでしょうか。ちなみに、H2O 使うとユーザの体感速度も速くなるのでいいことづくめかと思います。
以上、ウェブサーバの設定に関する注意喚起、兼、H2Oの宣伝でした。
公開鍵暗号の秘密鍵のように、比較的長期に渡って使われる鍵が漏えいしたときでも、それまで通信していた暗号文が解読されないという性質
鍵が漏れることも想定せよ――クラウド時代における「楕円曲線暗号」の必然性 - @IT
鍵が攻撃者や諜報機関など第三者の知るところとなった場合でも、それまで通信していた暗号文が解読されないようにしないといけない、という考え方とともに、最近 HTTPS を利用するウェブサイトにおいても導入が求められるようになってきた概念です。
前方秘匿性を満たすウェブサイトの設定方法については、TLSの暗号化方式をECDH_RSAあるいはECDHE_RSAに設定すれば良い、と述べている文献が多いです。
ですが、ほとんどのウェブサーバにおいて、それは誤りです。
なぜか。
通信を暗号化する鍵(セッション鍵)の確立にDHEあるいはECDHEを用いれば前方秘匿性が確保されるというのは、鍵交換に議論を限ってしまえば正しいです。
しかし、TLSプロトコルには、鍵交換以外にセッション鍵を保存し、再利用する仕組みが存在します。Session ResumptionとSession Ticketの2つがそれに該当します。
このうち、OpenSSLが標準でサポートし、ウェブブラウザが対応している場合(IE9以前とMobile Safari以外の全ての主要ウェブブラウザが該当します)にSession Resumptionより優先して利用されるSession Ticketは、セッション鍵をサーバのみが知るマスターキーで暗号化して、クライアントに送信します。
セッション鍵をマスターキーで暗号化…いやな響きがしませんか?
そうです。このSession Ticketの暗号化に使われるマスターキーを定期的に更新しない限り、マスターキーが流出してしまった場合、過去の通信内容がすべて解読されてしまうことになるのです。
しかし残念なことに、ほとんどのウェブサーバは、マスターキーを自動的に更新する仕組みをそなえていません。
では、どのようにサーバを設定すればいいでしょうか。
解決策1. Session Ticket機能を無効化する
第一の解決策はウェブサーバの設定でSession Ticket機能を無効化することです。Apache の場合は SSLSessionTickets、nginx の場合は ssl_session_tickets という設定コマンドを使うことで、無効化することができます。
しかし、nginx (とevent mpmを使用するApache)は、複数サーバにまたがる session resumption 機能を実装していません。そのため、ロードバランサの背後に複数のHTTPSサーバを立てている場合は、session ticket をオフにすると、新規接続確立のたびにTLSハンドシェイクが発生し、ユーザの体感速度の低下やサーバの負荷増大につながってしまいます。
解決策2. サーバを定期的に再起動する
ApacheやNginxは、サーバを起動するタイミングで Session Ticket のマスターキーを再生成します。なので、たとえば1時間に1回サーバを再起動すれば、前方秘匿性を確保しつつ Session Ticket を使うことができます。簡単ですね!!!
なお、ロードバランサの背後に複数のHTTPSサーバを立てている場合は、それらのサーバを再起動する度に、新しいマスターキーが記述された設定ファイルを再配布する必要があります。このへんは Twitter さんの涙ぐましい努力の話があるので、それを参考にがんばりましょう。
解決策3. H2O を使う
これまで述べてきたように、これまでのウェブサーバの前方秘匿性のサポートはお粗末と言わざるをえません(他にも、マスターキーの強度が強力なセッションキーよりも弱いといった問題も存在します)。
そこで H2O ですよ!!!!
私たちが開発しているH2Oの最新バージョンは、これらの問題を全て解決しています。
具体的に言うと、
・Session Ticket のマスターキーは、他のサーバのように AES-128 ではなく AES-256 です
・Session Ticket は自動的に更新されます(デフォルト15分間隔)
・ロードバランサの背後に複数台のH2Oを設置する場合、Session Ticketをmemcachedで共有するように設定することが可能です
・ついでに、Memcached を用いた複数サーバにまたがるSession Resumptionにも対応しているので、Mobile Safari でのHTTPSアクセスも高速に処理することができます
というわけで、安全なウェブサイトを構築したい人は H2O 使えばいいんじゃないでしょうか。ちなみに、H2O 使うとユーザの体感速度も速くなるのでいいことづくめかと思います。
以上、ウェブサーバの設定に関する注意喚起、兼、H2Oの宣伝でした。
 をもつウェブサイトの正しい設定方法")
Wednesday, July 22, 2015
H2O version 1.4.0 released with outstanding support for forward secrecy and load balancing (and the experimental mruby handler)
Today I am happy to announce the release of the H2O HTTP/2 server version 1.4.0.
There have been a few changes and bug fixes from version 1.3.1 (that showed big performance improvements over the older generations of HTTP servers without support for request prioritization), but the most prominent ones are the following.
Support for the PROXY protocol
The PROXY protocol is a de-facto standard protocol used by L4 load balancers (such as AWS Elastic Load Balancing) to notify the web servers running behind them the IP addresses of the clients. Support for the protocol is essential for running a web server behind such load balancer; without the support it is impossible to log the address of the client or to work against attacks.
In version 1.4.0, we have added support for the protocol which makes H2O a good choice for large scale and/or highly-available web sites running multiple HTTP servers behind a load balancer.
Support for cache-based and ticket-based TLS session resumption using Memcached (and forward secrecy)
The PROXY protocol is not the only thing that now makes H2O a good choice for such websites.
When running a HTTPS server cluster behind a L4 load balancer, it is desirable that the server supports session resumption using a shared datastore such as memcached.
TLS Session Resumption: Full-speed and Secure is a good read for those who are interested in what session resumption is; in short, it reduces the time spent for establishing a TLS connection to about half, and also reduces the CPU time to below 10%!
However, until now, front-end HTTP servers have been not good at supporting session resumption using a shared datastore.
Among the two resumption methods, Nginx does not support the more-widely-deployed cache-based session resumption using a shared datastore.
It should also be noted that most web servers are not good at supporting ticket-based resumption; they use 128-bit AES for storing master secrets (even in cases when a more complex ciphersuite is used), and also do not automatically roll-over the secrets (which botches forward-secrecy).
As pointed out by Tim Taubert, the sad state of the server-side TLS session resumption implementations has been the headache of administrators trying to setup secure websites. Forward Secrecy at Twitter is an example that shows how difficult it is to configure a website supporting forward-secrecy.
Being the primary developer of H2O, I believe that web servers should be easily configurable to be secure; so in version 1.4.0 we have implemented the following features:
Table 1.Supported Methods of Session Resumption
And with H2O, they are easy to use! A simple configuration like below activates all the features. The H2O server cluster will share information of both cache-based and ticket-based session resumption using memcached, with complex cipher used for protecting master secrets that are automatically rolled over.
Please refer to the documentation for the details of the configuration directive.
Experimental mruby Handler
We are also proud to announce that we now have a scripting engine running within the H2O standalone server that can be used to customize the behavior, and that the programming language is Ruby.
Developed by Yukihiro Matz (the father of the Ruby programming language) and others, mruby is an implementation of the language for embedded use. Thanks to MATSUMOTO Ryosuke the language runtime can now be used to script how the HTTP requests should be handled within H2O.
The handler is still in very early stages and considered unstable (therefore it is not turned on by default, you would need to pass
Please refer to Ryosuke's weblog for more information (in Japanese). In addition to topics related to H2O, you can find excellent entries about how to use a scripting engine within web servers to work against cyber attacks.
Conclusion
All in all, we are happy to provide a new release of the H2O server to the public, that is secure and easy to use (with flexibility), once again raising the bar of what people should expect on a HTTP server to provide.
I hope you enjoy using the new release of H2O.
There have been a few changes and bug fixes from version 1.3.1 (that showed big performance improvements over the older generations of HTTP servers without support for request prioritization), but the most prominent ones are the following.
Support for the PROXY protocol
The PROXY protocol is a de-facto standard protocol used by L4 load balancers (such as AWS Elastic Load Balancing) to notify the web servers running behind them the IP addresses of the clients. Support for the protocol is essential for running a web server behind such load balancer; without the support it is impossible to log the address of the client or to work against attacks.
In version 1.4.0, we have added support for the protocol which makes H2O a good choice for large scale and/or highly-available web sites running multiple HTTP servers behind a load balancer.
Support for cache-based and ticket-based TLS session resumption using Memcached (and forward secrecy)
The PROXY protocol is not the only thing that now makes H2O a good choice for such websites.
When running a HTTPS server cluster behind a L4 load balancer, it is desirable that the server supports session resumption using a shared datastore such as memcached.
TLS Session Resumption: Full-speed and Secure is a good read for those who are interested in what session resumption is; in short, it reduces the time spent for establishing a TLS connection to about half, and also reduces the CPU time to below 10%!
However, until now, front-end HTTP servers have been not good at supporting session resumption using a shared datastore.
Among the two resumption methods, Nginx does not support the more-widely-deployed cache-based session resumption using a shared datastore.
It should also be noted that most web servers are not good at supporting ticket-based resumption; they use 128-bit AES for storing master secrets (even in cases when a more complex ciphersuite is used), and also do not automatically roll-over the secrets (which botches forward-secrecy).
As pointed out by Tim Taubert, the sad state of the server-side TLS session resumption implementations has been the headache of administrators trying to setup secure websites. Forward Secrecy at Twitter is an example that shows how difficult it is to configure a website supporting forward-secrecy.
Being the primary developer of H2O, I believe that web servers should be easily configurable to be secure; so in version 1.4.0 we have implemented the following features:
- cache-based session resumption using memcached
- automatic rollover of master secret used for ticket-based resumption
- synchronization of master secrets that rollover, using memcached
- directive to configure the cipher used for encrypting tickets (with default being
aes-256-cbc)
| Resumption Method | ||
|---|---|---|
| Session Resumption | Session Ticket | |
| Apache (prefork) | yes | no forward-secrecy (AES-128) |
| Apache (worker) | yes | no forward-secrecy (AES-128) |
| Apache (event) | not sharable | no forward-secrecy (AES-128) |
| Nginx | not sharable | no forward-secrecy (AES-128) |
| Varnish (hitch) | needs recompile | no |
| H2O | yes | yes (AES-256) |
And with H2O, they are easy to use! A simple configuration like below activates all the features. The H2O server cluster will share information of both cache-based and ticket-based session resumption using memcached, with complex cipher used for protecting master secrets that are automatically rolled over.
listen:
  port: 443
  ssl:
    key-file: /path/to/key-file
    certificate-file: /path/to/certificate-file
  proxy-protocol: ON
ssl-session-resumption:
  method: all
  memcached:
    host: address.of.memcached.server
    port: 11211
Please refer to the documentation for the details of the configuration directive.
Experimental mruby Handler
We are also proud to announce that we now have a scripting engine running within the H2O standalone server that can be used to customize the behavior, and that the programming language is Ruby.
Developed by Yukihiro Matz (the father of the Ruby programming language) and others, mruby is an implementation of the language for embedded use. Thanks to MATSUMOTO Ryosuke the language runtime can now be used to script how the HTTP requests should be handled within H2O.
The handler is still in very early stages and considered unstable (therefore it is not turned on by default, you would need to pass
-DWITH_MRUBY=ON as an argument to CMake to build H2O with support for the mruby handler), but nevertheless it is already a great addition to the H2O HTTP server; such a scripting engine gives you great flexibility to customize the behavior of the server depending on the tiny aspects of a HTTP request, or to mitigate attacks.Please refer to Ryosuke's weblog for more information (in Japanese). In addition to topics related to H2O, you can find excellent entries about how to use a scripting engine within web servers to work against cyber attacks.
Conclusion
All in all, we are happy to provide a new release of the H2O server to the public, that is secure and easy to use (with flexibility), once again raising the bar of what people should expect on a HTTP server to provide.
I hope you enjoy using the new release of H2O.
")
Thursday, June 18, 2015
H2OとPHPを組み合わせるの、超簡単です(もしくはmod_rewriteが不要な理由)
FastCGI対応機能がH2Oにマージされたことを受けて、uzullaさんが「H2OでPHP(がちょっとだけ動くまで)」という記事を書いてくださっています。
ありがたやありがたや。
その中で、
ちなみにこの手のことをNginxでやろうとするともっと難しくて、以下のように
こんな難しい設定、書けるわけないだろうが!!!!!!!
というわけで、H2Oの場合はもっと簡単に設定できるようになっています。以下のような感じ。
単純ですね。どうなってるかはコメントを見れば自明かとも思いますが、以下解説します。
実は、H2Oの設定ファイルにおいては、1つのパスに複数のハンドラを設定することができるのです。
複数のハンドラが設定されている場合、H2O は有効なレスポンスが生成できるまで、ハンドラを順次実行していきます。つまり、コメントにあるように、ファイルが存在すればそれを返すし、存在しなければ /index.php/ 以下にリクエストを内部的に転送し、その転送した結果の応答をクライアントに返すわけです。
わかりやすいですね。簡単ですね。
少し理屈っぽい話をすると、mod_rewriteのようなリクエストを書き換える黒魔術は、おおむね3種類の目的に使われてきました。第1の目的は、複数のローカルのディレクトリツリーを重ね合わせてひとつのhttpサイトとして表示すること。第2の目的は、uzullaさんが指摘したような、特定の条件をもつ以外のURLの処理を、FastCGIやアプリケーションサーバに委譲すること。第3の目的は、User-Agentや言語設定によって異なる応答を返すこと。
ですが、前2者を実現するためだけならば、正規表現を用いてURLを書き換えるような手法は過剰にすぎて管理がしづらかったわけです。H2OにおけるPHP対応においては、この点を意識し、複数のハンドラの連鎖を可能にすることで、設定が安全簡潔にできるようにしたのでした。
ちなみに、uzullaさんの例では
最後になりますが、ここで説明したFastCGI対応機能を盛り込んだH2Oバージョン1.3は今朝方リリースされたので、PHPerの皆様もそれ以外の皆様も、お試しいただければ幸甚に存じます。
リンク先のリリース告知エントリにも書いてあるけど、他のウェブサーバより表示速度(first-paint time)が、かなり速いですよ!
ありがたやありがたや。
その中で、
いやはや、まったくそのとおりなわけです。http://hoge/entry/1みたいなのをphpにマップする方法はまだよくわかってません。その内しらべます
github.comを読む限り
FastCGI (or PHP) applications should be as easily configurable as it is for the Apache HTTP serverということで、やったぜ!ってなるんですけど、nginxはもとより、Apacheにおいても現状ルーターをつかっているようなアプリだとhtaccessをいちいちかかないといけないので、Apacheみたいなスタイルが楽なのか?というとちょっと疑問があります。
(たとえば以下みたいなの)
RewriteEngine On
RewriteCond %{REQUEST_FILENAME} !-f
RewriteRule ^ index.php [QSA,L]
ここらへんがスッっとかけないと、まあApache、nginx同様にH2Oの設定のタレが必要になるかなあ、という感じはあります。
ちなみにこの手のことをNginxでやろうとするともっと難しくて、以下のように
try_filesやfastcgi_split_path_infoを使わないと脆弱性が発生するなんて話があるそうです(参照: Setting up PHP-FastCGI and nginx? Don’t trust the tutorials: check your configuration! » Neal Poole)。これ、みんなちゃんとできてるんですかね?# Pass all .php files onto a php-fpm/php-fcgi server.
location ~ \.php$ {
try_files $uri =404;
fastcgi_split_path_info ^(.+\.php)(/.+)$;
include fastcgi_params;
fastcgi_index index.php;
fastcgi_param SCRIPT_FILENAME $document_root$fastcgi_script_name;
fastcgi_pass php;
}こんな難しい設定、書けるわけないだろうが!!!!!!!
というわけで、H2Oの場合はもっと簡単に設定できるようになっています。以下のような感じ。
paths:
  "/":
    # /path/to/doc-root以下の静的ファイルを返す(存在した場合)
    file.dir: /path/to/doc-root
    # 存在しなければ、/index.php/ に内部転送
    redirect:
      url: /index.php/
      internal: YES
      status: 307
単純ですね。どうなってるかはコメントを見れば自明かとも思いますが、以下解説します。
実は、H2Oの設定ファイルにおいては、1つのパスに複数のハンドラを設定することができるのです。
複数のハンドラが設定されている場合、H2O は有効なレスポンスが生成できるまで、ハンドラを順次実行していきます。つまり、コメントにあるように、ファイルが存在すればそれを返すし、存在しなければ /index.php/ 以下にリクエストを内部的に転送し、その転送した結果の応答をクライアントに返すわけです。
わかりやすいですね。簡単ですね。
少し理屈っぽい話をすると、mod_rewriteのようなリクエストを書き換える黒魔術は、おおむね3種類の目的に使われてきました。第1の目的は、複数のローカルのディレクトリツリーを重ね合わせてひとつのhttpサイトとして表示すること。第2の目的は、uzullaさんが指摘したような、特定の条件をもつ以外のURLの処理を、FastCGIやアプリケーションサーバに委譲すること。第3の目的は、User-Agentや言語設定によって異なる応答を返すこと。
ですが、前2者を実現するためだけならば、正規表現を用いてURLを書き換えるような手法は過剰にすぎて管理がしづらかったわけです。H2OにおけるPHP対応においては、この点を意識し、複数のハンドラの連鎖を可能にすることで、設定が安全簡潔にできるようにしたのでした。
ちなみに、uzullaさんの例では
php-fpmを使っていますが、H2Oはphp-cgiを自分で管理することができるので、小規模なウェブサイトにおいては、file.custom-handler: extension: .php fastcgi.spawn: "PHP_FCGI_CHILDREN=10 exec /usr/bin/php-cgi"のように書くと、別途FastCGIデーモンを管理する必要がなくなって、より幸せになれるでしょう(名前は
php-cgiでも、この設定においてはFastCGIとして動作します)。最後になりますが、ここで説明したFastCGI対応機能を盛り込んだH2Oバージョン1.3は今朝方リリースされたので、PHPerの皆様もそれ以外の皆様も、お試しいただければ幸甚に存じます。
リンク先のリリース告知エントリにも書いてあるけど、他のウェブサーバより表示速度(first-paint time)が、かなり速いですよ!
")
H2O HTTP/2 server version 1.3.0 released; provides faster response to user, adds support for FastCGI, range-request
Today we are happy to announce the release of H2O version 1.3.0. The new release includes many changes and bug fixes since 1.2.0, but the notable ones are as follows.
Faster response to user
It is known that providing faster response to users greatly improve their experience, and many web engineers work hard on optimizing the time spent until user starts seeing the contents. The theoretically easiest way to optimize the speed (without reducing the size of the data being transmitted) is to transfer essential contents first, before transmitting other data such as images.
With the finalization of HTTP/2, such approach has become practical thanks to it's dependency-based prioritization features. However, not all web browsers (and web servers) optimally prioritize the requests. The sad fact is that some of them do not prioritize the requests at all which actually leads to worse performance that HTTP/1.1 in some cases.
Since the release of version 1.2.0, we have conducted benchmark tests that measure first-paint time (time spent until the web browser starts rendering the new webpage), and have added a tuning parameter that can be turned on to optimize the first-paint time of web browsers that do not leverage the dependency-based prioritization, while not disturbing those that implement sophisticated prioritization logic.
The chart below shows the first-paint time measured using a virtual network with 100ms latency (typical for 4G mobile networks), rendering a web page containing jquery, CSS and multiple image files.
It is evident that the prioritization logic implemented in H2O and the web browsers together offer a huge reduction in first-paint time. As the developer of H2O, we believe that the prioritization logic implemented in H2O to be the best of class (if not the best among all), not only implementing the specification correctly but also for having practical tweaks to optimize against the existing web browsers.
In other words, web-site administrators can provide better (or the best) user-experience to the users by switching their web server to H2O. For more information regarding the topic, please read HTTP/2 (and H2O) improves user experience over HTTP/1.1 or SPDY.
Version 1.3.0 also supports TCP fast open, an extension to TCP/IP that reduces the time required for establishing a new connection. The extension is already implemented in Linux (and Android), and is also expected to be included in iOS 9. As of H2O version 1.3.0 the feature is turned on by default to provide even quicker user experience. Kudos go to Tatsuhiko Kubo for implementing the feature.
FastCGI support
Since the initial release of H2O many users have asked for the feature; it is finally available! And we are also proud that it is easy to use.
First, it can be configured either at path-level or extension-level. The latter means that for example you can simply map
The second is the ability to launch FastCGI process manager under the control of H2O. You do not need to spawn an external FastCGI server and maintain it separately.
Using these features, for example Wordpress can be set-up just by writing few lines of configuration.
Support for range-requests
Support for range-requests (HTTP requests that request a portion of a file) is essential for serving audio/video files. Thanks to Justin Zhu it is now supported by H2O.
Conclusion
All in all, H2O has become a much better product in version 1.3 by improving end-user experience and by adding new features.
We plan to continue improving the product. Stay tuned!
Faster response to user
It is known that providing faster response to users greatly improve their experience, and many web engineers work hard on optimizing the time spent until user starts seeing the contents. The theoretically easiest way to optimize the speed (without reducing the size of the data being transmitted) is to transfer essential contents first, before transmitting other data such as images.
With the finalization of HTTP/2, such approach has become practical thanks to it's dependency-based prioritization features. However, not all web browsers (and web servers) optimally prioritize the requests. The sad fact is that some of them do not prioritize the requests at all which actually leads to worse performance that HTTP/1.1 in some cases.
Since the release of version 1.2.0, we have conducted benchmark tests that measure first-paint time (time spent until the web browser starts rendering the new webpage), and have added a tuning parameter that can be turned on to optimize the first-paint time of web browsers that do not leverage the dependency-based prioritization, while not disturbing those that implement sophisticated prioritization logic.
The chart below shows the first-paint time measured using a virtual network with 100ms latency (typical for 4G mobile networks), rendering a web page containing jquery, CSS and multiple image files.
It is evident that the prioritization logic implemented in H2O and the web browsers together offer a huge reduction in first-paint time. As the developer of H2O, we believe that the prioritization logic implemented in H2O to be the best of class (if not the best among all), not only implementing the specification correctly but also for having practical tweaks to optimize against the existing web browsers.
In other words, web-site administrators can provide better (or the best) user-experience to the users by switching their web server to H2O. For more information regarding the topic, please read HTTP/2 (and H2O) improves user experience over HTTP/1.1 or SPDY.
Version 1.3.0 also supports TCP fast open, an extension to TCP/IP that reduces the time required for establishing a new connection. The extension is already implemented in Linux (and Android), and is also expected to be included in iOS 9. As of H2O version 1.3.0 the feature is turned on by default to provide even quicker user experience. Kudos go to Tatsuhiko Kubo for implementing the feature.
FastCGI support
Since the initial release of H2O many users have asked for the feature; it is finally available! And we are also proud that it is easy to use.
First, it can be configured either at path-level or extension-level. The latter means that for example you can simply map
.php files to the FastCGI handler without writing regular expressions to extract PATH_INFO.The second is the ability to launch FastCGI process manager under the control of H2O. You do not need to spawn an external FastCGI server and maintain it separately.
Using these features, for example Wordpress can be set-up just by writing few lines of configuration.
paths:
"/":
# serve static files if found
file.dir: /path/to/doc-root
# if not found, internally redirect to /index.php/...
redirect:
url: /index.php/
internal: YES
status: 307
# handle PHP scripts using php-cgi (FastCGI mode)
file.custom-handler:
  extension: .php
  fastcgi.spawn: "PHP_FCGI_CHILDREN=10 exec /usr/bin/php-cgi"
Of course it is possible to configure H2O to connect to FastCGI applications externally using TCP/IP or unix sockets.Support for range-requests
Support for range-requests (HTTP requests that request a portion of a file) is essential for serving audio/video files. Thanks to Justin Zhu it is now supported by H2O.
Conclusion
All in all, H2O has become a much better product in version 1.3 by improving end-user experience and by adding new features.
We plan to continue improving the product. Stay tuned!

Wednesday, June 3, 2015
HTTP/2 (and H2O) improves user experience over HTTP/1.1 or SPDY
HTTP/2 is expected to offer better user experience than HTTP/1.1, the unanswered question is how much the benefit is in practice.
Tonight I have given a presentation regarding the issue, showing HTTP/2 performance of H2O HTTP server at shibuya.pm, a popular technology meetup at Tokyo. This blog post is a summary of the presentation at the meetup, following my recent blog post about the prioritization logic of HTTP/2 and web browser implementations.
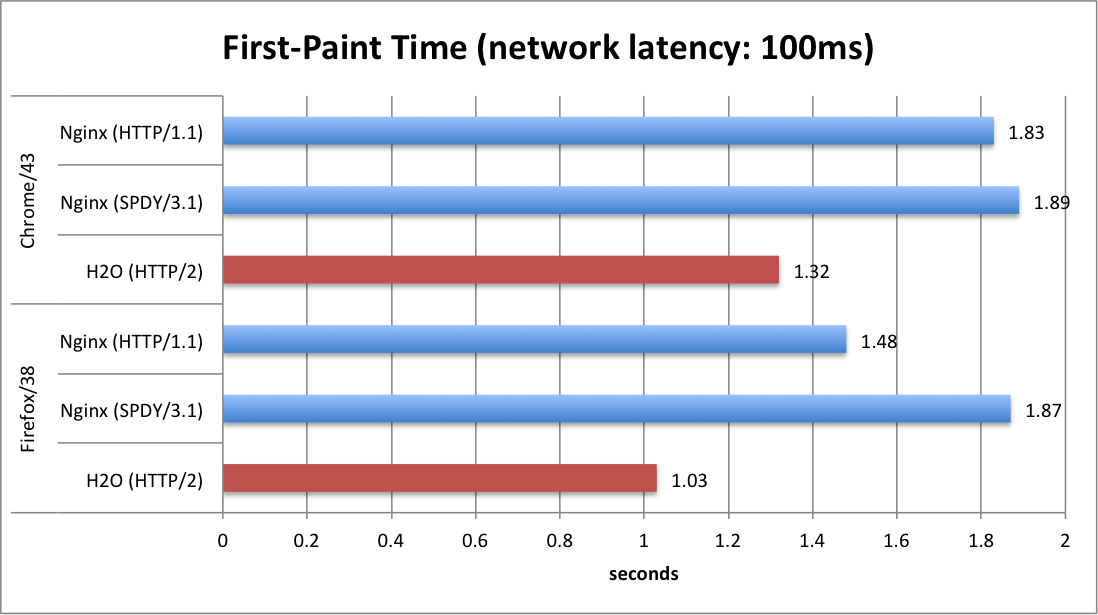
Test Scenario:
Benchmark Results:

Analysis:
When using H2O (and HTTP/2) with optimal settings, the first-paint times are reduced by about 30% when compared to HTTP/1.1 or SPDY/3.1.
First-paint time is a good index of user experience; it shows the timing when the user sees the page being rendered for the first time (or when all assets that block rendering arrives at the client side) since he/she triggered the navigation.
The improvements are due to the fact that Firefox (or Chrome with H2O's
Conclusion:
With the benchmark showing 30% reduction in first-paint time, it is obvious that HTTP/2 (implemented by H2O) is offering superior performance against the protocols of previous generations. However, implementations might not be mature enough to offer such boost in performance (as discussed in recent blog post, Chrome has issues with its prioritization logic which is worked around by the configuration directive of H2O; Nginx does not prioritize the streams even though such feature is available in SPDY).
For the time being it is suggested that users conduct benchmarks to see if their applications actually become faster, or consult the developers of the HTTP servers for benchmark results.
Or, you can use H2O, which has been hereby shown to provide good performance under the described scenario :-)
PS. The presentation slides used at the meetup is available here:
Tonight I have given a presentation regarding the issue, showing HTTP/2 performance of H2O HTTP server at shibuya.pm, a popular technology meetup at Tokyo. This blog post is a summary of the presentation at the meetup, following my recent blog post about the prioritization logic of HTTP/2 and web browser implementations.
Test Scenario:
- a modified version of http2rulez.com (<script> tags moved into <head>)
- contains 5 CSS files
- 8 script files in <head>, including a minified version of jquery.js
- contains 18 not-blocking assets (e.g. images files), both small and large
- client: Chrome/43 and Firefox/38
- server: Nginx/1.9.1 and H2O/HEAD
- network: dedicated virtual network to avoid noise; 100ms latency (typical for 4G mobile) added artificially using
tc disccommand
Benchmark Results:

Analysis:
When using H2O (and HTTP/2) with optimal settings, the first-paint times are reduced by about 30% when compared to HTTP/1.1 or SPDY/3.1.
First-paint time is a good index of user experience; it shows the timing when the user sees the page being rendered for the first time (or when all assets that block rendering arrives at the client side) since he/she triggered the navigation.
The improvements are due to the fact that Firefox (or Chrome with H2O's
http2-reprioritize-blocking-assets configuration directive set to ON) downloads assets files that block rendering (e.g. CSS or JS files) before other asset files (e.g. images).Conclusion:
With the benchmark showing 30% reduction in first-paint time, it is obvious that HTTP/2 (implemented by H2O) is offering superior performance against the protocols of previous generations. However, implementations might not be mature enough to offer such boost in performance (as discussed in recent blog post, Chrome has issues with its prioritization logic which is worked around by the configuration directive of H2O; Nginx does not prioritize the streams even though such feature is available in SPDY).
For the time being it is suggested that users conduct benchmarks to see if their applications actually become faster, or consult the developers of the HTTP servers for benchmark results.
Or, you can use H2O, which has been hereby shown to provide good performance under the described scenario :-)
PS. The presentation slides used at the meetup is available here:
 improves user experience over HTTP/1.1 or SPDY")
Wednesday, May 27, 2015
C言語で「1時間以内に解けなければプログラマ失格となってしまう5つの問題が話題に」の5問目を解いてみた
「Java8で「ソフトウェアエンジニアならば1時間以内に解けなければいけない5つの問題」の5問目を解いてみた」と「Perl6で「ソフトウェアエンジニアならば1時間以内に解けなければいけない5つの問題」の5問目を解いてみた」経由。
以下のような問題ですね。
正解が出るようになるまでの所要時間、約30分。なんとかプログラマ合格のようです。
以下のような問題ですね。
1,2,…,9の数をこの順序で、”+”、”-“、またはななにもせず結果が100となるあらゆる組合せを出力するプログラムを記述せよ。例えば、1 + 2 + 34 – 5 + 67 – 8 + 9 = 100となるとてもいい問題だと思うし、一方で上の回答例がeval的な手法を使っていたので、そういうズルをせずに解いたらどうなるだろう、ということでCで書いてみた。
正解が出るようになるまでの所要時間、約30分。なんとかプログラマ合格のようです。
#include <stdio.h>

#define MAX_POS 9
#define EXPECTED 100

static char buf[32];

static void doit(int pos, int sum, char *p, int sign)
{
    int i, n, s;

    *p++ = sign == 1 ? '+' : '-';
    for (i = pos, n = 0; i <= MAX_POS; ++i, n *= 10) {
        *p++ = '0' + i;
        n += i;
        s = sum + sign * n;
        if (i == MAX_POS) {
            if (s == EXPECTED) {
                *p = '\0';
                printf("%s = %d\n", buf + 1, s);
            }
        } else {
            doit(i + 1, s, p, 1);
            doit(i + 1, s, p, -1);
        }
    }
}

int main(void)
{
    doit(1, 0, buf, 1);
    return 0;
}

Thursday, May 21, 2015
How to properly spawn an external command in C (or not use posix_spawn)
When spawning an external command, as a programmer, you would definitely want to determine if you have succeeded in doing so.
Unfortunately,
In case of Linux, the function returns zero (i.e. success) even if the external command does not exist.
The document suggests that if the function succeeded in spawning the command should be determined asynchronously by checking the exit status of
Recently I have faced the issue while working on H2O, and have come up with a solution; a function that spawns an external command that synchronously returns an error if it failed to do so.
What follows is the core logic I implemented. It is fairly simple; it uses the traditional approach of spawning an external command:
The actual implementation used in H2O does more; it has a feature to remap the file descriptors so that the caller can communicate with the spawned command via pipes. You can find the implementation here.
I am not sure if this kind of workaround is also needed for other languages, but I am afraid it might be the case.
Anyways I wrote this blogpost as a memo for myself and hopefully others. Happy hacking!
Unfortunately,
posix_spawn (and posix_spawnp) does not provide such a feature. To be accurate, there is no guaranteed way to synchronously determine if the function has succeeded in spawning the command synchronously.In case of Linux, the function returns zero (i.e. success) even if the external command does not exist.
The document suggests that if the function succeeded in spawning the command should be determined asynchronously by checking the exit status of
waitpid. But such approach (that waits for the termination of the sub-process) cannot be used if your intension is to spawn a external command that is going to run continuously.Recently I have faced the issue while working on H2O, and have come up with a solution; a function that spawns an external command that synchronously returns an error if it failed to do so.
What follows is the core logic I implemented. It is fairly simple; it uses the traditional approach of spawning an external command:
fork and execvp. And at the same time uses a pipe with FD_CLOEXEC flag set to detect the success of execvp (the pipe gets closed), which is also used for returning errno in case the syscall fails.pid_t safe_spawnp(const char *cmd, char **argv)
{
int pipefds[2] = {-1, -1}, errnum;
pid_t pid;
ssize_t rret;
/* create pipe, used for sending error codes */
if (pipe2(pipefds, O_CLOEXEC) != 0)
goto Error;
/* fork */
if ((pid = fork()) == -1)
goto Error;
if (pid == 0) {
/* in child process */
execvp(cmd, argv);
errnum = errno;
write(pipefds[1], &errnum, sizeof(errnum));
_exit(127);
}
/* parent process */
close(pipefds[1]);
pipefds[1] = -1;
errnum = 0;
while ((rret = read(pipefds[0], &errnum, sizeof(errnum))) == -1
&& errno == EINTR)
;
if (rret != 0) {
/* spawn failed */
while (waitpid(pid, NULL, 0) != pid)
;
pid = -1;
errno = errnum;
goto Error;
}
/* spawn succeeded */
close(pipefds[0]);
return pid;
Error:
errnum = errno;
if (pipefds[0] != -1)
close(pipefds[0]);
if (pipefds[1] != -1)
close(pipefds[1]);
errno = errnum;
return -1;
}
The actual implementation used in H2O does more; it has a feature to remap the file descriptors so that the caller can communicate with the spawned command via pipes. You can find the implementation here.
I am not sure if this kind of workaround is also needed for other languages, but I am afraid it might be the case.
Anyways I wrote this blogpost as a memo for myself and hopefully others. Happy hacking!
")
Monday, May 18, 2015
benchart - ベンチマークを記録、表示するプログラムを書いた
速度重要なプログラムを書いていると、継続的にベンチマークを記録し、いつでも参照可能にしておくことは重要。だけど、そのためにExcelを起動するのは面倒だし、だいたい、ベンチマークを測定するためのコマンドを覚えていられないので、benchartというコマンドを作った。
github.com/kazuho/benchart
やってくれることは、以下の3つです。
以下、使用イメージ。
たとえば、qrintfのベンチマークを取ることを考えてみると、examples/ipv4addr.cをコンパイルして実行し、time(1)の値を記録したい。
このコマンドをbenchartに引数として渡してやると、コマンドを実行し、その結果をbenchart.xmlというファイルに保存してくれる。sh -c をつけてるのは、その引数をサブシェルでハンドリングするためだし、timeに-pオプションをつけてるのは、空白区切の単位なしの出力にするため。
で、次に
更に前のバージョンをチェックアウトしてベンチマークを取ろうとすると、エラーが出た。
「そうだ、コマンド名が変わったんだった!」
というわけで、旧形式のコマンドを指定して再実行。
ついでに、もう1個古いバージョンも記録。
で、測定結果をグラフ表示するには、

ベンチマークを記録するのに使ったコマンドは
自分用にでっちあげたものだけど、これでベンチマークを取る苦痛が減ったらいいなと思ってる。
やってくれることは、以下の3つです。
- ベンチマーク結果を保存
- ベンチマーク測定に使用したコマンドを保存し、再実行
- ベンチマーク結果をグラフにして表示
以下、使用イメージ。
たとえば、qrintfのベンチマークを取ることを考えてみると、examples/ipv4addr.cをコンパイルして実行し、time(1)の値を記録したい。
$ bin/qrintf gcc -O2 examples/ipv4addr.c && time ./a.out 1234567890
result: 73.150.2.210

real 0m0.176s
user 0m0.170s
sys 0m0.003s
こんな感じ。
このコマンドをbenchartに引数として渡してやると、コマンドを実行し、その結果をbenchart.xmlというファイルに保存してくれる。sh -c をつけてるのは、その引数をサブシェルでハンドリングするためだし、timeに-pオプションをつけてるのは、空白区切の単位なしの出力にするため。
benchart record -- sh -c 'bin/qrintf gcc -O2 examples/ipv4addr.c && /usr/bin/time -p ./a.out 1234567890 2>&1'
Following scores were recorded under name: 283a25e.

    real: 0.17
    user: 0.17
    sys: 0.00

If the results look unapropriate, run `/usr/local/bin/benchart pop` to pop the result.
で、次に
v0.9.2でもベンチマークを記録したいので、git checkoutして、今度は引数なしでbenchart recordを実行すると、前回と同じコマンドを実行して、ベンチマークをとってくれる。$ git checkout v0.9.2
$ benchart record
Following scores were recorded under name: v0.9.2.
real: 0.17
user: 0.17
sys: 0.00
If the results look unapropriate, run `/usr/local/bin/benchart pop` to pop the result.
更に前のバージョンをチェックアウトしてベンチマークを取ろうとすると、エラーが出た。
$ git checkout v0.9.1
$ benchart record
re-running benchmark command: sh -c bin/qrintf gcc -O2 examples/ipv4addr.c && /usr/bin/time -p ./a.out 1234567890 2>&1
sh: bin/qrintf: No such file or directory
benchmark script failed with exit status:32512
「そうだ、コマンド名が変わったんだった!」
というわけで、旧形式のコマンドを指定して再実行。
$ benchart record -- sh -c 'bin/qrintf-gcc -O2 examples/ipv4addr.c && /usr/bin/time -p ./a.out 1234567890 2>&1'
Following scores were recorded under name: v0.9.1.

    real: 0.21
    user: 0.20
    sys: 0.00

If the results look unapropriate, run `/usr/local/bin/benchart pop` to pop the result.
ついでに、もう1個古いバージョンも記録。
$ git checkout v0.9.0
$ benchart record
re-running benchmark command: sh -c bin/qrintf-gcc -O2 examples/ipv4addr.c && /usr/bin/time -p ./a.out 1234567890 2>&1
Following scores were recorded under name: v0.9.0.

    real: 0.20
    user: 0.19
    sys: 0.00

If the results look unapropriate, run `/usr/local/bin/benchart pop` to pop the result.
で、測定結果をグラフ表示するには、
benchart showコマンドを実行。$ benchart showすると、ウェブブラウザでこんな感じでチャートが表示されます。

ベンチマークを記録するのに使ったコマンドは
benchart list-commandsで一覧表示することができ、benchart record --reuse=nameコマンドで、任意の測定コマンドを再実行可能。自分用にでっちあげたものだけど、これでベンチマークを取る苦痛が減ったらいいなと思ってる。

Thursday, May 14, 2015
jailing - chroot jailを構築・運用するためのスクリプトを書いた
個人サーバで外部に公開するサービスを動かすときには、chrootを使うにこしたことはないわけです。サービス毎にchrootしてあれば、サーバソフトウェアにセキュリティホールがあっても、他の情報が漏洩したりする可能性をぐっとおさえることができるわけですから。
でも、そのためだけにVPSにdockerとかコンテナを入れて使うってのは、構築も運用もめんどくさいし、ディスク容量食うし、やりたくない。systemd-nspawnも割と重たい雰囲気だし、LTSなubuntuだとそもそもsystemd入ってないし…
俺たちがほしいのは、ホストの環境の一部のみにアクセスできる、手軽なjailだー! ってわけで、ざっくり書いたのが、jailing。
github.com/kazuho/jailing
/usr/bin等、OS由来のディレクトリをchroot環境にread-onlyでエクスポートしつつ、指定されたコマンドを、そのchroot環境で動かすスクリプトです。
/usr/localや/homeといったディレクトリはエクスポートしないので、chroot環境下のソフトウェアにセキュリティホールがあって侵入されたとしても、(カーネルにバグがなければ)chroot環境外の情報が漏洩することはありません。
ホストとchroot環境でディレクトリを共有するためには、--bindオプションを使います。
たとえば、/usr/local/apache下にインストールしたApacheをchroot環境下で動かしたいなって時、jailingを使えば、以下のようにコマンド一発でchroot環境を作成して実行できます。
簡単ですね!
詳しくは
でも、そのためだけにVPSにdockerとかコンテナを入れて使うってのは、構築も運用もめんどくさいし、ディスク容量食うし、やりたくない。systemd-nspawnも割と重たい雰囲気だし、LTSなubuntuだとそもそもsystemd入ってないし…
俺たちがほしいのは、ホストの環境の一部のみにアクセスできる、手軽なjailだー! ってわけで、ざっくり書いたのが、jailing。
/usr/bin等、OS由来のディレクトリをchroot環境にread-onlyでエクスポートしつつ、指定されたコマンドを、そのchroot環境で動かすスクリプトです。
/usr/localや/homeといったディレクトリはエクスポートしないので、chroot環境下のソフトウェアにセキュリティホールがあって侵入されたとしても、(カーネルにバグがなければ)chroot環境外の情報が漏洩することはありません。
ホストとchroot環境でディレクトリを共有するためには、--bindオプションを使います。
たとえば、/usr/local/apache下にインストールしたApacheをchroot環境下で動かしたいなって時、jailingを使えば、以下のようにコマンド一発でchroot環境を作成して実行できます。
% sudo jailing --root=/var/httpd-jail \
    --bind /usr/local/apache \
    -- \
    /usr/local/apache/bin/httpd \
    -c /usr/local/apache/conf/httpd.conf
あるいは、/usr/local/h2o下にインストールしたH2Oをchroot環境下で動かす場合は、こんな感じ。% sudo jailing --root /var/h2o-jail \
--bind /usr/local/h2o \
-- \
/usr/local/h2o/bin/h2o \
-m daemon \
-c /usr/local/h2o/etc/h2o.conf
あるいは、jail内に入るには、% sudo jailing --root /var/h2o-jail \
-- \
bash
とかやればいいわけです。簡単ですね!
詳しくは
man jailingしたりしてください。それでは〜

Monday, May 11, 2015
Clangに対応し、より高速になったqrintf version 0.9.2をリリースしました
ひさしぶりにqrintf関連の作業を行い、バージョン0.9.2をリリースしました。
ご存知のように、qrintfは、ccacheやdistccと同様の仕組みでCコンパイラのラッパーとして動作する、sprintf(とsnprintf)の最適化フィルターです。
qrintfを利用することで、整数や文字列をフォーマットするsprintfやsnprintfは最大10倍高速化され、また、H2Oのようなhttpdが20%程度高速化することが知られています。
今回のリリースは、0.9.1以降に行われた以下の改善を含んでいます。
以下の実行例からも、GCCでもClangでもIPv4アドレスの文字列化ベンチマークにおいて、qrintfを利用することで10倍以上の高速化が実現できていることが分かります。
今後は、qrintfをH2Oにバンドルすることで、qrintfの恩恵をより多くの利用者に届けて行きたいと考えています。同様のことは、他のソフトウェアプロジェクトでも可能なのではないでしょうか。
それでは、have fun!
ご存知のように、qrintfは、ccacheやdistccと同様の仕組みでCコンパイラのラッパーとして動作する、sprintf(とsnprintf)の最適化フィルターです。
qrintfを利用することで、整数や文字列をフォーマットするsprintfやsnprintfは最大10倍高速化され、また、H2Oのようなhttpdが20%程度高速化することが知られています。
今回のリリースは、0.9.1以降に行われた以下の改善を含んでいます。
- 数値の変換速度の改善(@imasahiro氏による)#9 #10
- Clangへの暫定対応と、それにともなうコマンドラインインターフェイスの変更 #13 #16
-DQRINTF_NO_AUTO_INCLUDEオプションによる、自動#includeの抑止 #14%.*sへの対応 #7
以下の実行例からも、GCCでもClangでもIPv4アドレスの文字列化ベンチマークにおいて、qrintfを利用することで10倍以上の高速化が実現できていることが分かります。
$ qrintf --version
v0.9.2
$ gcc -O2 examples/ipv4addr.c && time ./a.out 1234567890
result: 73.150.2.210

real 0m2.512s
user 0m2.506s
sys 0m0.003s
$ qrintf gcc -O2 examples/ipv4addr.c && time ./a.out 1234567890
result: 73.150.2.210

real 0m0.173s
user 0m0.170s
sys 0m0.002s
$ clang -O2 examples/ipv4addr.c && time ./a.out 1234567890
result: 73.150.2.210

real 0m2.487s
user 0m2.479s
sys 0m0.004s
$ qrintf clang -O2 examples/ipv4addr.c && time ./a.out 1234567890
result: 73.150.2.210

real 0m0.220s
user 0m0.214s
sys 0m0.002s
今後は、qrintfをH2Oにバンドルすることで、qrintfの恩恵をより多くの利用者に届けて行きたいと考えています。同様のことは、他のソフトウェアプロジェクトでも可能なのではないでしょうか。
それでは、have fun!

Thursday, April 16, 2015
HTTP/2 is much faster than SPDY thanks to dependency-based prioritization
Background
HTTP/2 provides two methods to prioritize streams (e.g. files being served).
One method is called weight-based prioritization. In weight-based prioritization, every stream is given a weight, and the value is used by the server to proportionally distribute the bandwidth between the streams.
The other method is dependency-based prioritization. By using the method, web browsers can advise HTTP/2 servers to send the streams that are depended by other streams before sending the other streams. For example, by using dependency-based prioritization web browsers can request the server to send CSS or JavaScript files before sending HTML or image files.
As of this writing, out of the two popular web browsers that implement HTTP/2, only Firefox uses dependency-based prioritization.
The case of Mozilla Firefox
The prioritization strategy of Firefox is as follows1:
Below is the network time chart generated by Firefox 37.0.1 when accessing a sample web page3 (given 100ms network latency6) containing a number of CSS, script files, and images. H2O version 1.2.0 was used as the HTTP/2 server for running the benchmark.

By looking at the chart, you can see that many CSS, script files and images are requested in parallel at some time around 320ms, but that the download of files that block rendering (e.g. CSS and script files) complete before any of the images (even the smallest ones) become available. This is due to the fact, as I explained earlier, that Firefox notifies the HTTP/2 server that HTML and image files depend on the CSS and the script files to become rendered; therefore the server is sending the files being depended before sending the dependents. And thanks to the prioritization, all the files that are required to do the initial rendering arrives at the web browser (a.k.a. first-paint time) at around 1.0 seconds from start.
The case of Google Chrome
On the other hand Chrome's prioritization logic only uses the weight-based prioritization; the logic remains mostly same with that used in SPDY. Chrome assigns a predefined weight to each of the stream based on their types.
Table 1. Priority weight values used by Google Chrome4
And here is the timing chart taken using Chrome (version 44.0.2371.0 canary) when accessing the same web page.

Unlike Firefox, CSS and script files are not arriving before the image files. If you look carefully, you will find a vague relationship between the size and the arrive time of the contents independent to their types. This is because each of the files are interleaved into a single TCP stream based on their weights, and because of the fact that the weight between the files do not differ much. Therefore the initial-paint time is as late as 1.5 seconds5.
Conclusion
As shown, dependency-based prioritization introduced in HTTP/2 brings non-negligible benefit in terms of web-site performance. In case of the benchmark, Firefox using dependency-based prioritization was 1.5x faster than Google Chrome only using weight-based prioritization when comparing the first-print timings.
My understanding is that the developers of Chrome is aware of this issue, so hopefully it will be fixed soon. I also hope that other web browser vendors will utilize dependency-based prioritization. As shown, it is clearly the way to go!
PS. And it should also be worth noting that HTTP/2 servers should implement the prioritization logics correctly. In case of H2O, the server both of the prioritization logics are fully implemented using a per-frame weight-based round robin with the frame size of 16Kbytes at maximum.
HTTP/2 provides two methods to prioritize streams (e.g. files being served).
One method is called weight-based prioritization. In weight-based prioritization, every stream is given a weight, and the value is used by the server to proportionally distribute the bandwidth between the streams.
The other method is dependency-based prioritization. By using the method, web browsers can advise HTTP/2 servers to send the streams that are depended by other streams before sending the other streams. For example, by using dependency-based prioritization web browsers can request the server to send CSS or JavaScript files before sending HTML or image files.
As of this writing, out of the two popular web browsers that implement HTTP/2, only Firefox uses dependency-based prioritization.
Note: the background section has been rewritten due to the fact that the comparison with SPDY turns out to be wrong, as pointed out in the comment. The original version of the section is here. Rest of the blogpost stays in tact.
The case of Mozilla Firefox
The prioritization strategy of Firefox is as follows1:
- send CSS and JavaScript files in
<HEAD>before HTML and/or image files by using dependency-based prioritization - HTML streams are given 2.5x bandwidth above image streams (by using weight-based prioritization)
- script files within
<BODY>are in total given about the half bandwidths of the other files2
Below is the network time chart generated by Firefox 37.0.1 when accessing a sample web page3 (given 100ms network latency6) containing a number of CSS, script files, and images. H2O version 1.2.0 was used as the HTTP/2 server for running the benchmark.

By looking at the chart, you can see that many CSS, script files and images are requested in parallel at some time around 320ms, but that the download of files that block rendering (e.g. CSS and script files) complete before any of the images (even the smallest ones) become available. This is due to the fact, as I explained earlier, that Firefox notifies the HTTP/2 server that HTML and image files depend on the CSS and the script files to become rendered; therefore the server is sending the files being depended before sending the dependents. And thanks to the prioritization, all the files that are required to do the initial rendering arrives at the web browser (a.k.a. first-paint time) at around 1.0 seconds from start.
The case of Google Chrome
On the other hand Chrome's prioritization logic only uses the weight-based prioritization; the logic remains mostly same with that used in SPDY. Chrome assigns a predefined weight to each of the stream based on their types.
| Type | Weight |
|---|---|
| HTML | 256 |
| CSS | 220 |
| script | 183 |
| image | 110 |
And here is the timing chart taken using Chrome (version 44.0.2371.0 canary) when accessing the same web page.

Unlike Firefox, CSS and script files are not arriving before the image files. If you look carefully, you will find a vague relationship between the size and the arrive time of the contents independent to their types. This is because each of the files are interleaved into a single TCP stream based on their weights, and because of the fact that the weight between the files do not differ much. Therefore the initial-paint time is as late as 1.5 seconds5.
Conclusion
As shown, dependency-based prioritization introduced in HTTP/2 brings non-negligible benefit in terms of web-site performance. In case of the benchmark, Firefox using dependency-based prioritization was 1.5x faster than Google Chrome only using weight-based prioritization when comparing the first-print timings.
My understanding is that the developers of Chrome is aware of this issue, so hopefully it will be fixed soon. I also hope that other web browser vendors will utilize dependency-based prioritization. As shown, it is clearly the way to go!
PS. And it should also be worth noting that HTTP/2 servers should implement the prioritization logics correctly. In case of H2O, the server both of the prioritization logics are fully implemented using a per-frame weight-based round robin with the frame size of 16Kbytes at maximum.
note 1: ref: HTTP/2 Dependency Prioritization in Firefox 37, Http2Stream.cpp line 1088 of Firefox
note 2: ref: nsScriptLodare.cpp line 306; I am not sure if this is the intended behavior, IMO script tags in BODY should given a priority equiv. to HTML or image files, and it might be the case that the condition of the if statement should be reversed.
note 3: http2rulez.com was used for testing the load speed, with the
note 4: ref: MapPriorityToWeight function of Chrome
note 5: the network chart of Chrome includes a 0.2 second block before initianting the TCP connection, which has been subtracted from the numbers written in this blog text.
note 6: An Ubuntu 14.04 instance running on VMware Fusion 7.1.1 on top of OS X 10.9.5 was used for running the server. Network latency was given using
note 2: ref: nsScriptLodare.cpp line 306; I am not sure if this is the intended behavior, IMO script tags in BODY should given a priority equiv. to HTML or image files, and it might be the case that the condition of the if statement should be reversed.
note 3: http2rulez.com was used for testing the load speed, with the
<script> tags at the end of the document moved into <HEAD>note 4: ref: MapPriorityToWeight function of Chrome
note 5: the network chart of Chrome includes a 0.2 second block before initianting the TCP connection, which has been subtracted from the numbers written in this blog text.
note 6: An Ubuntu 14.04 instance running on VMware Fusion 7.1.1 on top of OS X 10.9.5 was used for running the server. Network latency was given using
tc qdisc command. Both the web browsers were run directly on OS X 10.9.5.
Tuesday, April 14, 2015
H2O version 1.2.0 released; bundles LibreSSL by default
This is the release announcement of H2O version 1.2.0. Full list of changes can be found in the Changes. The release includes a fix for a heap-overrun vulnerability in the proxy module; users of prior versions using the H2O as a reverse proxy are urged to upgrade to 1.2.0.
Aside from the bug fixes, we have adjusted the code-base so that no external dependencies would be required when building the standalone server.
One of the hustles while trying to install the older versions of H2O (or any other HTTP/2 server) was that it required the newest version of OpenSSL (version 1.0.2). This is because ALPN, a feature that became only available in version 1.0.2 is essential for the HTTP/2 protocol.
However it is often difficult to upgrade OpenSSL on existing systems, since it is used by other important softwares as well (SSH, etc.).
In H2O version 1.2.0, we have chosen to bundle LibreSSL. LibreSSL is not only considered more stable than OpenSSL; it also support new cipher-suites like chacha20-poly1305, which is the preferred cipher suite of Chrome for Android.
If CMake (the build tool used by H2O) does not detect OpenSSL version 1.0.2 or above, it would instruct the build chain to use LibreSSL being bundled. To enforce the use of libressl being bundled, pass
Version 1.2.0 also bundles other dependencies as well, so that the server can be installed as simply as by running
Have fun!
Aside from the bug fixes, we have adjusted the code-base so that no external dependencies would be required when building the standalone server.
One of the hustles while trying to install the older versions of H2O (or any other HTTP/2 server) was that it required the newest version of OpenSSL (version 1.0.2). This is because ALPN, a feature that became only available in version 1.0.2 is essential for the HTTP/2 protocol.
However it is often difficult to upgrade OpenSSL on existing systems, since it is used by other important softwares as well (SSH, etc.).
In H2O version 1.2.0, we have chosen to bundle LibreSSL. LibreSSL is not only considered more stable than OpenSSL; it also support new cipher-suites like chacha20-poly1305, which is the preferred cipher suite of Chrome for Android.
If CMake (the build tool used by H2O) does not detect OpenSSL version 1.0.2 or above, it would instruct the build chain to use LibreSSL being bundled. To enforce the use of libressl being bundled, pass
-DWITH_BUNDLED_SSL=on as an argument to CMake (note: you might need to clear the build directory before running cmake). Or set -DWITH_BUNDLED_SSL=off to explicitly disable the use of libressl.Version 1.2.0 also bundles other dependencies as well, so that the server can be installed as simply as by running
cmake, make, and make install.Have fun!

Tuesday, March 31, 2015
さらば、愛しき論理削除。MySQLで大福帳型データベースを実現するツール「daifuku」を作ってみた
先のエントリ「論理削除はなぜ「筋が悪い」か」で書いたとおり、データベースに対して行われた操作を記録し、必要に応じて参照したり取り消したりしたいという要求は至極妥当なものですが、多くのRDBは、そのために簡単に使える仕組みを提供していません。
というわけで作った。
daifukuは、RDBに対して加えられた変更をトランザクション単位でRDB内にJSONとして記録するためのストアドやトリガを生成するコマンドです。
次に出力内容を確認し、mysqlのルートユーザ権限でSQLを実行すると、準備は完了。
また、記録されるトランザクションログのid(
実際に使ってみた例が以下になります。トランザクション内で行った
大規模なコンシューマ向けウェブサービスでは、この種のトリガは使いづらいかもしれませんが、バックオフィス向けのソフトウェア等では工数削減と品質向上に役立つ可能性があると思います。
ってことで、それでは、have fun!
補遺:他のアプローチとの比較
同様の機能をアプリケーションロジックとして、あるいは手書きのトリガとして実装することも不可能ではありませんが、トリガを自動生成する daifuku のアプローチの方が、アプリケーション開発に必要な工数、バグ混入の可能性、データベースのロック時間の極小化等の点において優れていると考えられます。
また、過去の任意のタイミングにおけるデータベースの状態を参照する必要がある場合は、範囲型による時間表現を用いたデータベース設計を行うべきでしょうが、要件が操作の記録やUndoである場合には、そのような過剰な正規化は不要であり悪影響のほうが大きいです注4。ってかMySQLには範囲型ないし。
ないのなら、作ってみようホトトギス
というわけで作った。
daifukuは、RDBに対して加えられた変更をトランザクション単位でRDB内にJSONとして記録するためのストアドやトリガを生成するコマンドです。
% daifuku dbname tbl1 tbl2 > setup.sqlのように実行すると、指定されたテーブル(ここでは
tbl1とtbl2)にセットすべきトリガや、更新ログを記録するためのテーブル「daifuku_log」を生成するCREATE TABLEステートメントなど、必要なSQL文をsetup.sqlファイルに出力します。次に出力内容を確認し、mysqlのルートユーザ権限でSQLを実行すると、準備は完了。
% mysql -u root < setup.sqlあとは、トランザクションの先頭で
daifuku_begin()プロシージャを呼び出せば、以降同一のトランザクション内で加えられた変更は、全てdaifuku_logテーブルに単一のJSON形式の配列として記録されます。daifuku_begin()には、任意の文字列を渡し、RDBの変更とあわせて記録することができるので、更新の意図や操作を行った者の名前等を記録することにより、監査や障害分析を柔軟に行うことが可能になります。また、記録されるトランザクションログのid(
daifuku_log.id)は@daifuku_idというセッション変数に保存されるので、アプリケーションではその値をアプリケーション側のテーブルに記録することで、操作ログをUIに表示したり、Undo機能注2を実装したりすることも可能でしょう。実際に使ってみた例が以下になります。トランザクション内で行った
direct_messageテーブルとnotificationテーブルに対する操作がJSON形式でdaifuku_logテーブルに保存されていることが確認できます注3。mysql> begin;
Query OK, 0 rows affected (0.00 sec)
mysql> call daifuku_begin('');
Query OK, 1 row affected (0.00 sec)
mysql> insert into direct_message (from_user,to_user,body) values (2,1,'WTF!!!');
Query OK, 1 row affected (0.01 sec)
mysql> insert into notification (user,body) values (2,'@yappo sent a new message');
Query OK, 1 row affected (0.00 sec)
mysql> commit;
Query OK, 0 rows affected (0.01 sec)
mysql> select * from daifuku_log\G
*************************** 1. row ***************************
id: 4
info:
action: [
[
"insert",
"direct_message",
{},
{
"id": "2",
"from_user": "2",
"to_user": "1",
"body": ["V1RGISEh"]
}
],[
"insert",
"notification",
{},
{
"id": "2",
"user": "2",
"body": ["QHlhcHBvIHNlbnQgYSBuZXcgbWVzc2FnZQ=="]
}
]
]
1 row in set (0.00 sec)
大規模なコンシューマ向けウェブサービスでは、この種のトリガは使いづらいかもしれませんが、バックオフィス向けのソフトウェア等では工数削減と品質向上に役立つ可能性があると思います。
ってことで、それでは、have fun!
補遺:他のアプローチとの比較
同様の機能をアプリケーションロジックとして、あるいは手書きのトリガとして実装することも不可能ではありませんが、トリガを自動生成する daifuku のアプローチの方が、アプリケーション開発に必要な工数、バグ混入の可能性、データベースのロック時間の極小化等の点において優れていると考えられます。
また、過去の任意のタイミングにおけるデータベースの状態を参照する必要がある場合は、範囲型による時間表現を用いたデータベース設計を行うべきでしょうが、要件が操作の記録やUndoである場合には、そのような過剰な正規化は不要であり悪影響のほうが大きいです注4。ってかMySQLには範囲型ないし。
注1: 名前の由来は大福帳型データベースです。
注2: トランザクション単位のrevertではなく
注3: 文字列型等、制御文字やUTF-8の範囲外の値を含む可能性のある型のデータについては、base64エンコードが行われ、それを示すために配列としてログに記録されます。詳しくは
注4: 操作=トランザクションとは元来リレーションに1対1でマッピングされづらいものなので、過去の操作を取り扱うことが主目的の場合には、無理に正規化を行わない方が都合が良いケースが多いと考えられます。
注2: トランザクション単位のrevertではなく
daifuku_logテーブルに記録されたログを逆順に適用していった際に以前のテーブルの状態に戻ることを保証したい場合は、分離レベルをシリアライザブルに設定しておく必要があります。この点において、更新ログを主、現時点での状態を示すテーブルを従とするアプローチに対し劣位であることは、先の記事でも触れたとおりです。注3: 文字列型等、制御文字やUTF-8の範囲外の値を含む可能性のある型のデータについては、base64エンコードが行われ、それを示すために配列としてログに記録されます。詳しくは
man daifukuをご参照ください。注4: 操作=トランザクションとは元来リレーションに1対1でマッピングされづらいものなので、過去の操作を取り扱うことが主目的の場合には、無理に正規化を行わない方が都合が良いケースが多いと考えられます。

Thursday, March 26, 2015
論理削除はなぜ「筋が悪い」か
「論理削除が云々について - mike-neckのブログ」を読んで。
データベース設計において、「テーブルの書き換えをするな、immutableなマスタと更新ログによって全てを構成しろ」というこの記事の主張はモデリング論として全く正しい。
だが、残念なことに、ディスクやメモリが貴重な資源だった時代の技術であるRDBは、そのようなモデリングに基づいて設計されたデータベースには必ずしも適していない。
第一の問題は、RDBに対してなされる様々な「更新」(トランザクション)は不定形(どのテーブルをどのように修正するかはアプリケーション依存)だという点。不定形な「更新」を時系列にそってRDBに記録していくのは、設計と並走性の点において困難あるいは煩雑なコーディングが必要になる(というか、そのような「イベント」による「変化」はREDOログに書き、その更新された「状態」をテーブルに反映していくというのがRDBの「一般的な使われ方」)。
第二の問題は、ほとんどのデータベースアクセスは、更新が蓄積された結果である「現在の状態」を問い合わせるものになるが、immutableなマスタと更新ログによって構成されるデータベース設計においては、そのような問い合わせに効率的に応答するのが難しいという点である。
従って、現実的なデータベース設計においては、多くのテーブルが「現在の状態」をもつ、immutableなマスタと更新ログから合成可能な「現在の状態を表現するビュー」を実体化したものとして表現されることになる。
ふりかえって、論理削除とはなにか。「現在の状態を表現する実体化ビュー」に、過去の状態(かつて存在したデータであることを意味する「削除済」)をフラグとして付与したものである。
「現在の状態を表現する」ことを前提にしたビューであるところのテーブルに、過去の状態の一部だけを表現するフラグを追加するのが「筋が悪い」設計だというのは明らかだ。
過去の状態を参照すべき要件があるなら、そのテーブルが表現する情報についてはimmutableなマスタと更新ログを用意し、その射影として表現されるビューとして「現在の状態」を実現すべきである。そのようなビューは自動生成できるならしても良いし、手動で更新するなら、ストアドを使うか、あるいはアプリケーションのデータベースアクセス層において手続きをまとめる方法を考えるべきだろう。
ただ、immutableなマスタ、更新ログと「現時点のビュー」の3テーブルを準備・運用するというのはそれなりにコストがかかるので、筋が悪い「削除フラグ」(より一般化すれば状態フラグ)を使うかどうかはケースバイケースで判断するのもひとつの見識である。
まとめ:
こういった点を理解・検討した上で、「それでも削除フラグの方が楽だろう」という判断を下しているなら良いと思います。
追記: Re: 論理削除はなぜ「筋が悪い」か - Blog by Sadayuki Furuhashiで挙げられていた疑問点について:
が、アプリケーション要件に関わらず正しく動作する方法が何かという問に対しては、RDB側でトリガ(あるいはストアド)として実装するのが安全だというのが答えになるでしょう。また、アプリケーションが操作可能な処理は「immutableなマスタ」と更新ログテーブルへの追記のみとし、両者への操作から「現在の状態を表現するビュー」を生成すべきであって、「現在の状態を表現するビュー」をアプリケーションが操作し、その変更内容をトリガでログに出力するという方式は避けるべきという話になるかと思います。
なぜか。そうしないと分離レベルや主キーの発番処理に起因する込み入った条件が色々…続きはお近くのDBAにご相談ください。
こんな感じかと思います。
データベース設計において、「テーブルの書き換えをするな、immutableなマスタと更新ログによって全てを構成しろ」というこの記事の主張はモデリング論として全く正しい。
だが、残念なことに、ディスクやメモリが貴重な資源だった時代の技術であるRDBは、そのようなモデリングに基づいて設計されたデータベースには必ずしも適していない。
第一の問題は、RDBに対してなされる様々な「更新」(トランザクション)は不定形(どのテーブルをどのように修正するかはアプリケーション依存)だという点。不定形な「更新」を時系列にそってRDBに記録していくのは、設計と並走性の点において困難あるいは煩雑なコーディングが必要になる(というか、そのような「イベント」による「変化」はREDOログに書き、その更新された「状態」をテーブルに反映していくというのがRDBの「一般的な使われ方」)。
第二の問題は、ほとんどのデータベースアクセスは、更新が蓄積された結果である「現在の状態」を問い合わせるものになるが、immutableなマスタと更新ログによって構成されるデータベース設計においては、そのような問い合わせに効率的に応答するのが難しいという点である。
従って、現実的なデータベース設計においては、多くのテーブルが「現在の状態」をもつ、immutableなマスタと更新ログから合成可能な「現在の状態を表現するビュー」を実体化したものとして表現されることになる。
ふりかえって、論理削除とはなにか。「現在の状態を表現する実体化ビュー」に、過去の状態(かつて存在したデータであることを意味する「削除済」)をフラグとして付与したものである。
「現在の状態を表現する」ことを前提にしたビューであるところのテーブルに、過去の状態の一部だけを表現するフラグを追加するのが「筋が悪い」設計だというのは明らかだ。
過去の状態を参照すべき要件があるなら、そのテーブルが表現する情報についてはimmutableなマスタと更新ログを用意し、その射影として表現されるビューとして「現在の状態」を実現すべきである。そのようなビューは自動生成できるならしても良いし、手動で更新するなら、ストアドを使うか、あるいはアプリケーションのデータベースアクセス層において手続きをまとめる方法を考えるべきだろう。
ただ、immutableなマスタ、更新ログと「現時点のビュー」の3テーブルを準備・運用するというのはそれなりにコストがかかるので、筋が悪い「削除フラグ」(より一般化すれば状態フラグ)を使うかどうかはケースバイケースで判断するのもひとつの見識である。
まとめ:
- データベース設計にあたっては、テーブルを「現在の状態」を表現するものとして設計するか、それとも「immutableなマスタと更新ログ、および現時点の状態を表現するビュー」として設計するかという、2つの選択肢がある
- 前者は簡潔で性能が高くなるが、過去の情報を参照できないという問題がある
- 「削除フラグ」というのは、「現在の状態」を表現するテーブルに過去の状態の一部を表現する機能を場当たり的に足したもの(なので筋が悪い)
- それよりも、過去の情報を参照する要件がある場合(もしくはそのような要件が発生すると想定される場合)は、テーブル単位で「immutableなマスタと更新ログ」という設計を採用しつつ、現在の情報をビューとして表現することを考えた方がよい
こういった点を理解・検討した上で、「それでも削除フラグの方が楽だろう」という判断を下しているなら良いと思います。
追記: Re: 論理削除はなぜ「筋が悪い」か - Blog by Sadayuki Furuhashiで挙げられていた疑問点について:
効率的にSELECTや更新ができるスキーマを作ろうとすると、VIEWやFUNCTIONなど、側に実装するコードが増えてくる。それらのコードは、上記のようにDB側に実装しても良い(するべき)だろうか?それともアプリケーションに実装するべきだろうか?アプリケーション要件によるでしょう。
が、アプリケーション要件に関わらず正しく動作する方法が何かという問に対しては、RDB側でトリガ(あるいはストアド)として実装するのが安全だというのが答えになるでしょう。また、アプリケーションが操作可能な処理は「immutableなマスタ」と更新ログテーブルへの追記のみとし、両者への操作から「現在の状態を表現するビュー」を生成すべきであって、「現在の状態を表現するビュー」をアプリケーションが操作し、その変更内容をトリガでログに出力するという方式は避けるべきという話になるかと思います。
なぜか。そうしないと分離レベルや主キーの発番処理に起因する込み入った条件が色々…続きはお近くのDBAにご相談ください。
テーブルのスキーマは停止時間なしで変更する手法をいくつか思いつくが(PostgreSQLなら)、上記のレコードを削除する操作などはアプリケーションの変更を伴うので難しい(アプリケーションとDBのスキーマをアトミックに変更できない)カラムのアクセス権は無停止で変更できませんか? つまり、アプリケーションを拡張した結果として削除フラグの存在が冗長になったのであれば、そのフラグの更新をストアドあるいはトリガで行われるように変更し、書き込み権限をドロップすればいいでしょう。
こんな感じかと思います。

Subscribe to:
Posts (Atom)